Connecting your software to WhatsApp
API Management is how another system — your billing software, your online store, your own backend — sends WhatsApp messages through WizMessage. You issue it an API key here, tell it which approved WhatsApp template it may send, and point it at a webhook so replies come back. This guide walks the whole path, then documents the REST API your developers will call.
Two ways to connect
Everything on this page is the WizMessage API. There is a second surface, the Meta Graph API, which mirrors Meta's own WhatsApp Cloud API so that code already written against Meta works after changing the base URL and the token.
Choose the WizMessage API if you are starting from nothing — the template mapping and the reference field remove most of the work. Choose the Meta Graph API if you already have Cloud API code, a library, or a developer who knows Meta's shapes.
The dashboard, keys, permissions and rate limits below apply to both.
The dashboard
Where your API keys live
Every key you have issued appears here under API Keys. Each row shows the key's status, its public prefix (the only part of the key ever shown again after you create it), and how many calls it has made today. "Manage" opens the key; the toggle pauses it without deleting it.
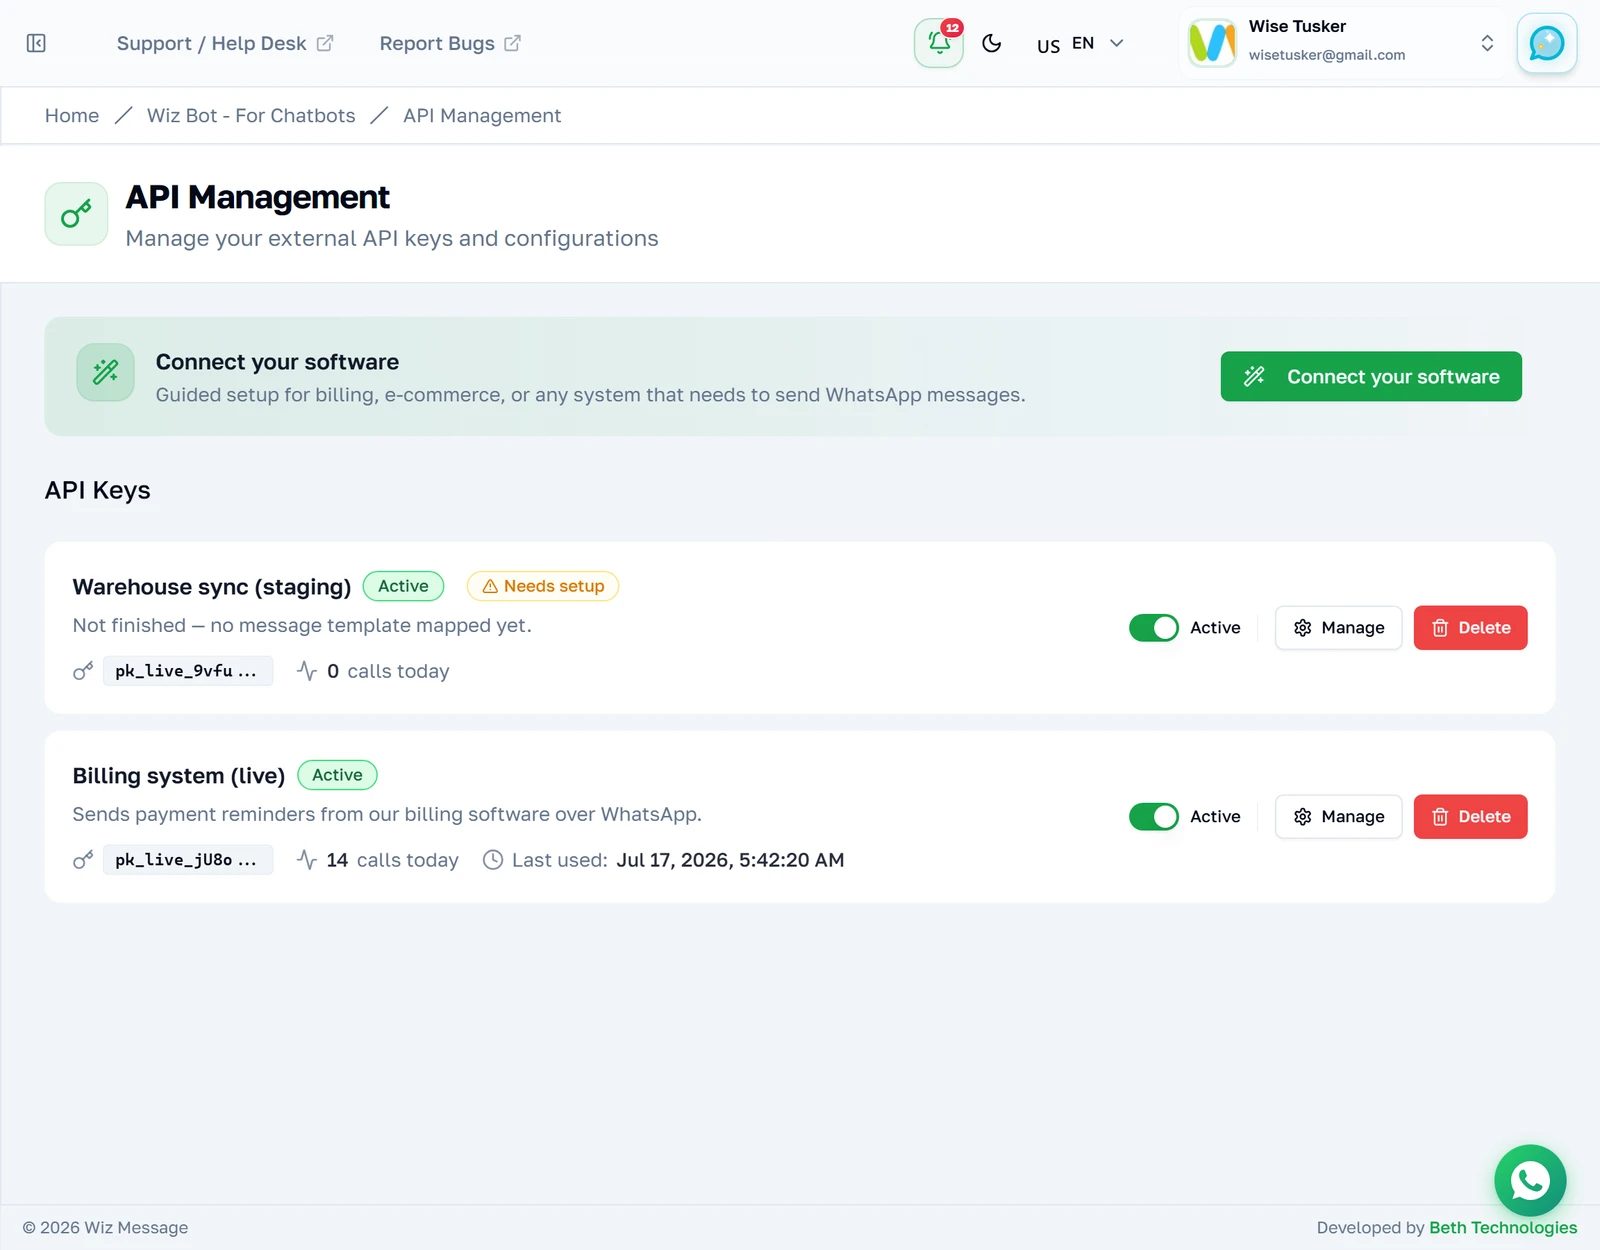
A key that is not finished yet
A key with no template mapped to it carries a "Needs setup" badge. It can authenticate, but it cannot send a template message until you map one — so a half-configured integration is visible at a glance rather than failing later at send time.

Guided setup
Step 1 — What are you connecting?
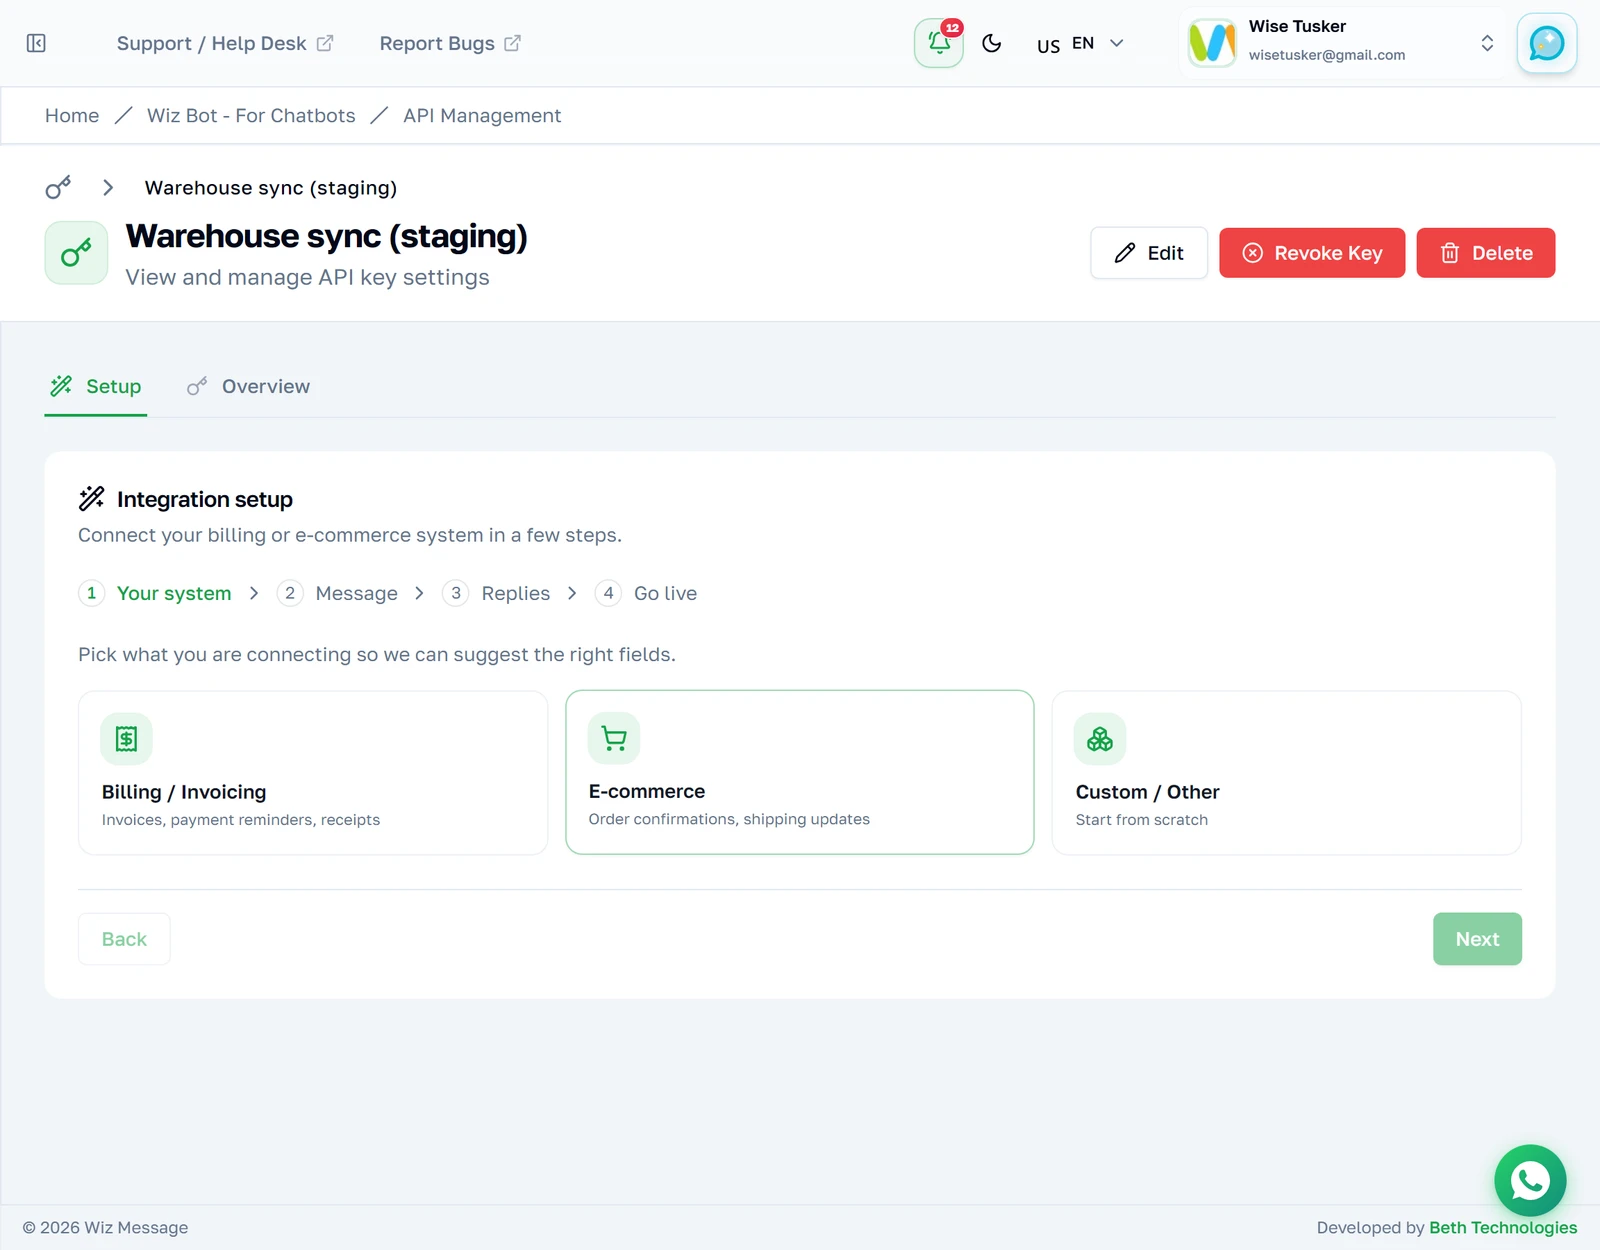
"Connect your software" opens a four-step wizard. Start by naming the key after the system that will use it, and pick the preset that matches. The presets only suggest sensible field names — billing suggests invoice_number, amount, due_date, customer_name — they do not restrict what you can map.
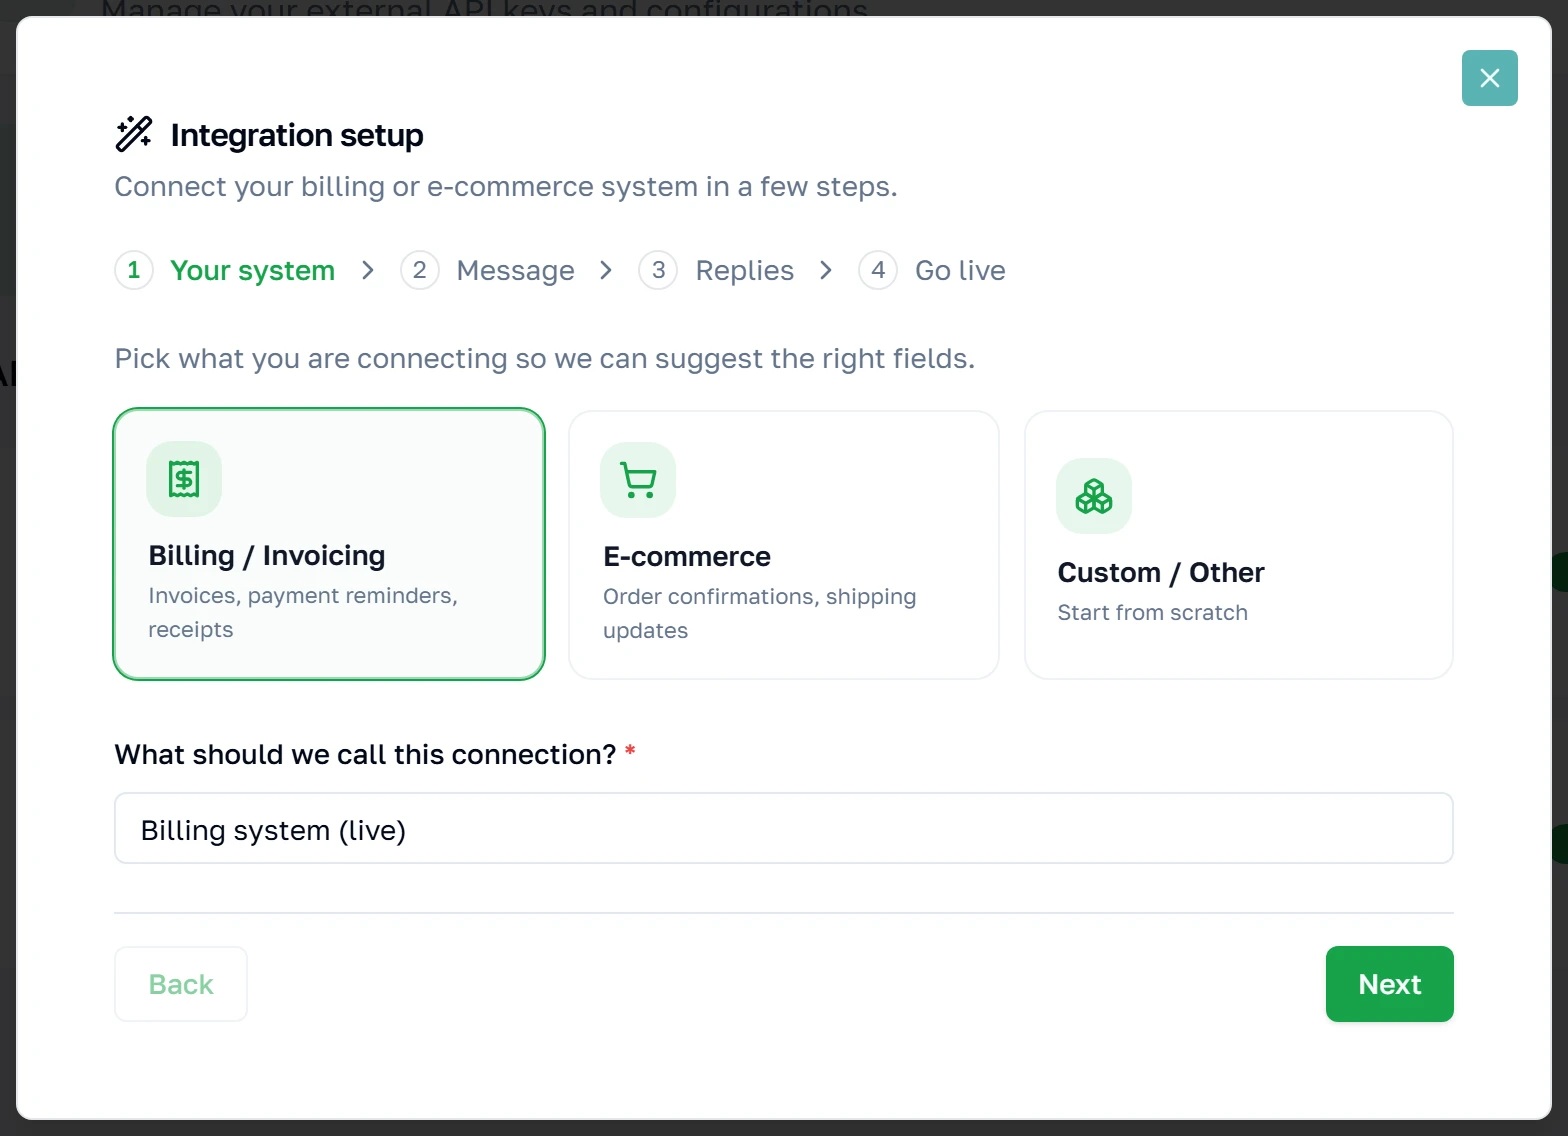
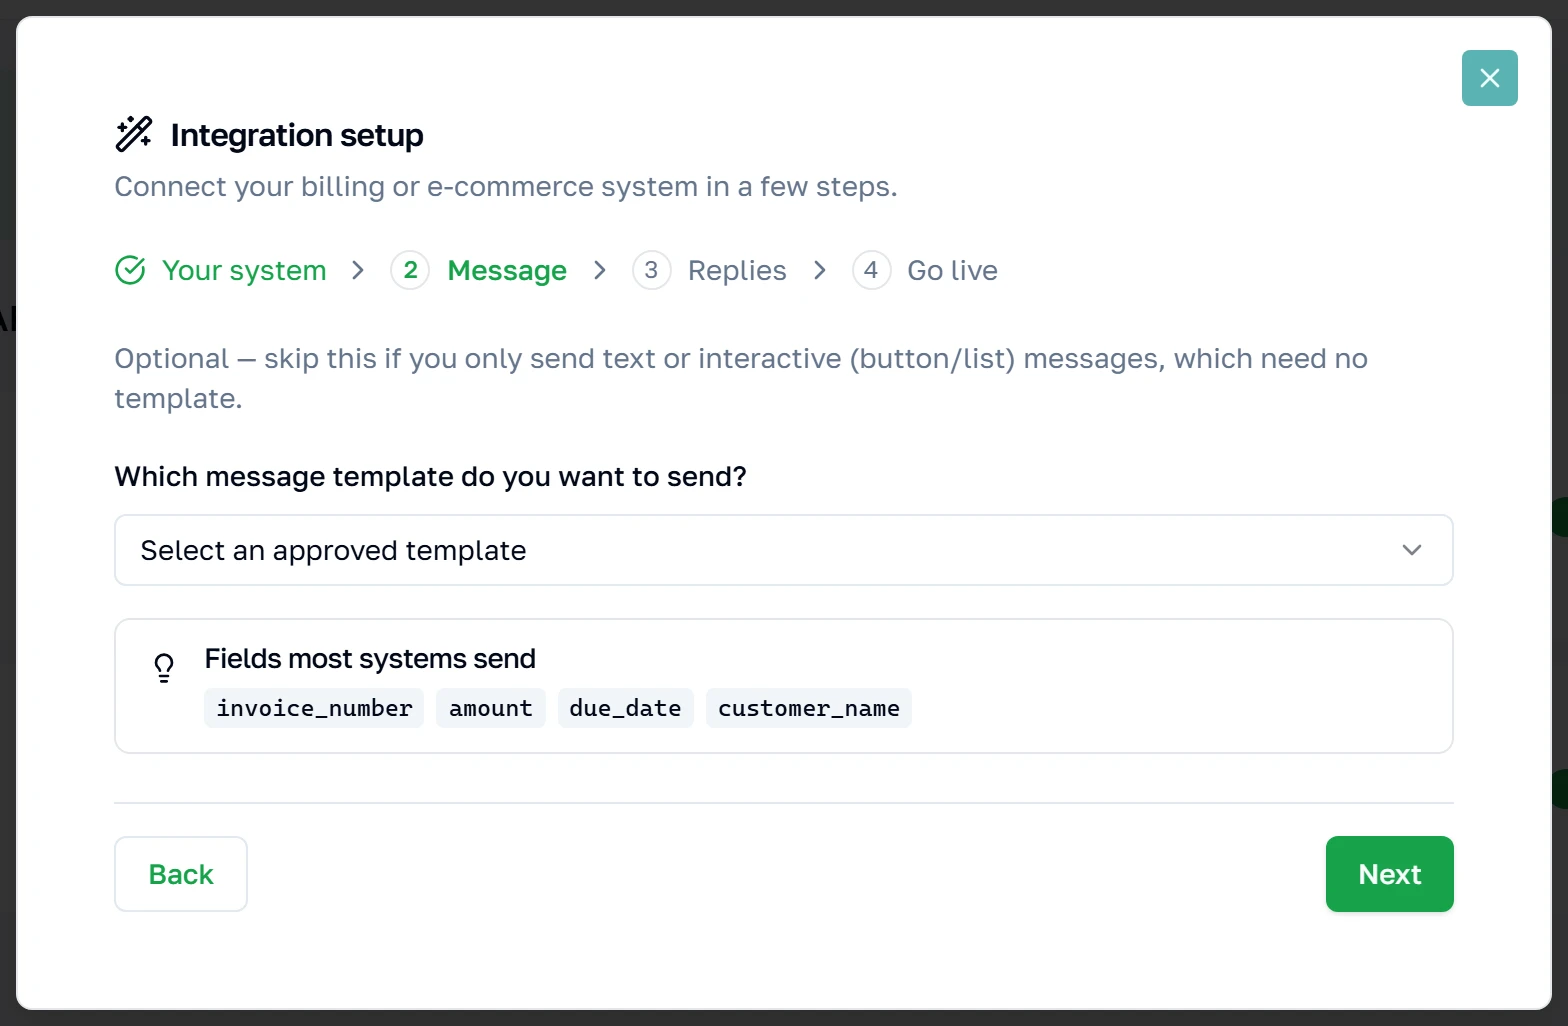
Step 2 — Choose the message
Pick one of your approved WhatsApp templates. Templates live at Meta, not here — this list is fetched live from your connected WhatsApp account, and only APPROVED templates can be sent. This step is optional: skip it if the key only ever sends plain text, and map a template later.
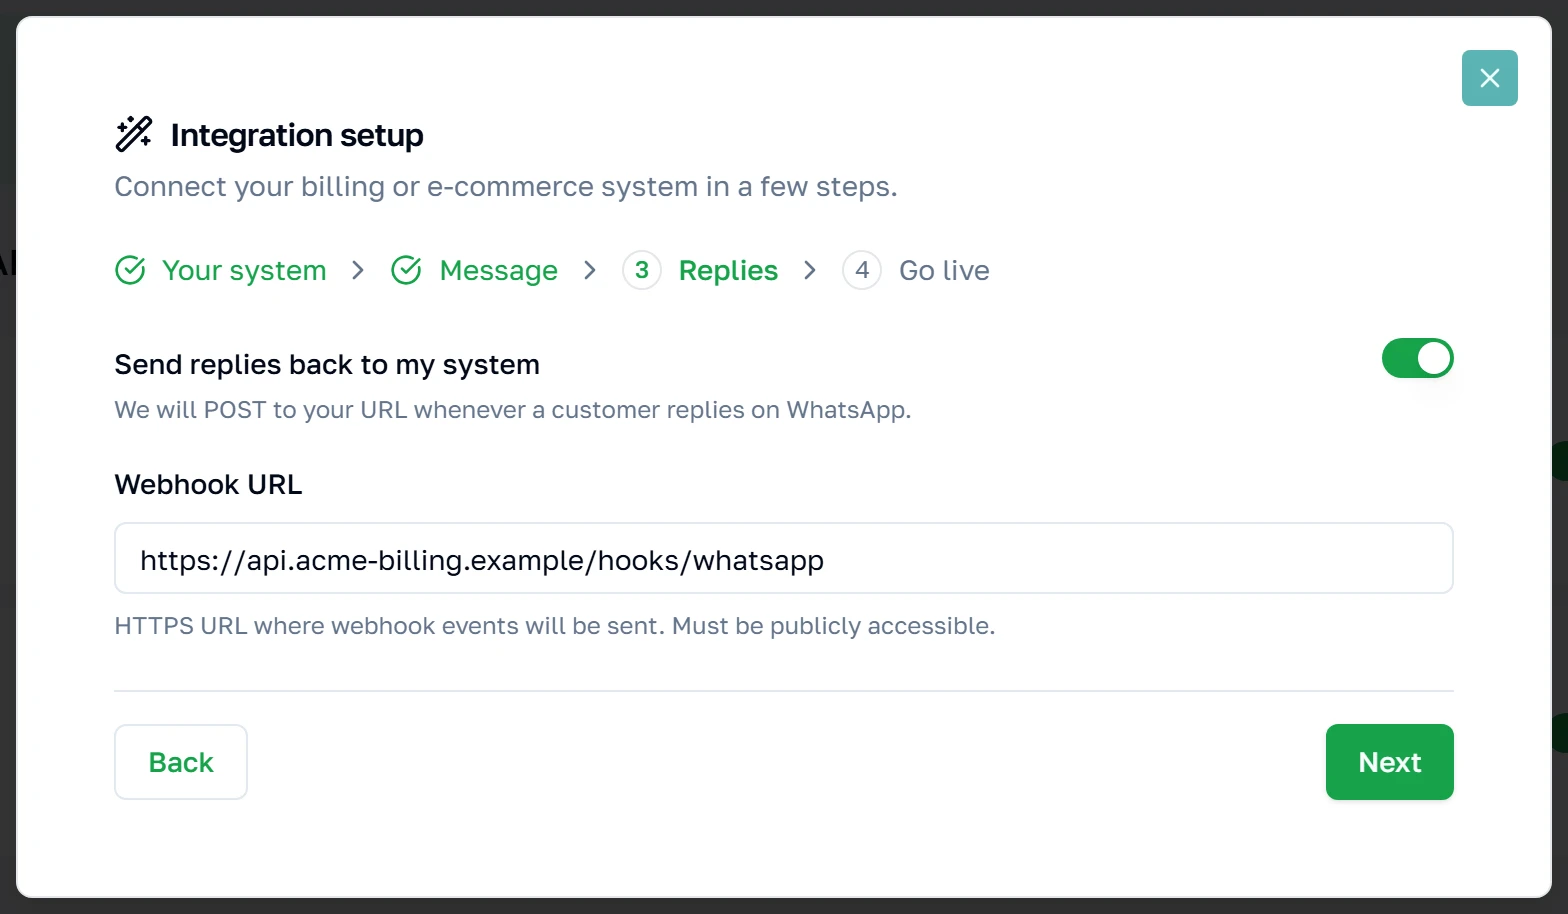
Step 3 — Where should replies go?
When someone replies to your message, or a delivery report comes back, we POST it to a URL you control. Leave this off if your system only ever sends. You can add it later from the key's Webhooks tab — nothing here is permanent.
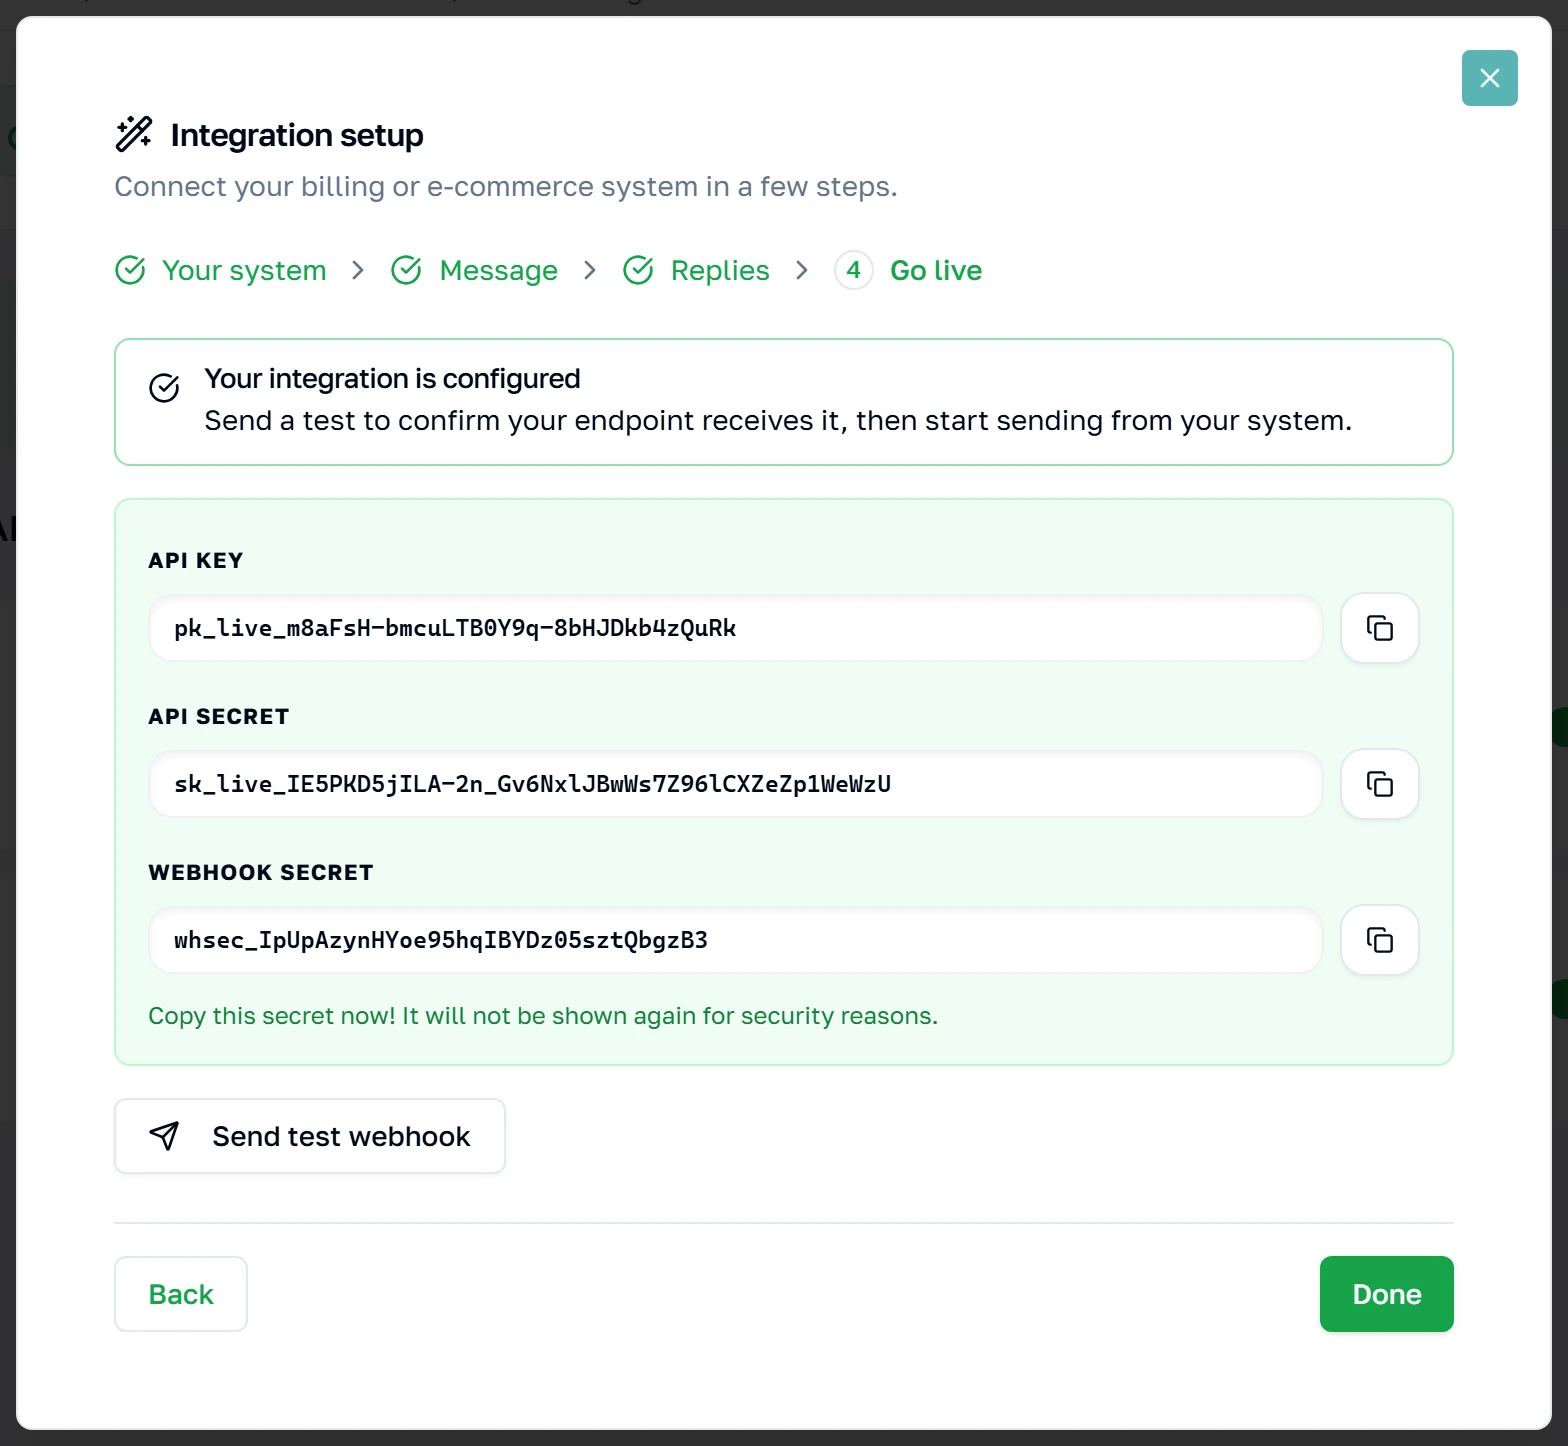
Step 4 — Go live
Pressing Next on the previous step is what actually creates the key — this screen is the confirmation. Copy all three values now: the API key, the API secret, and the webhook signing secret are shown exactly once and cannot be recovered afterwards. If you lose the secret you must rotate it, which means updating whatever system was using it.
Managing a key
Overview
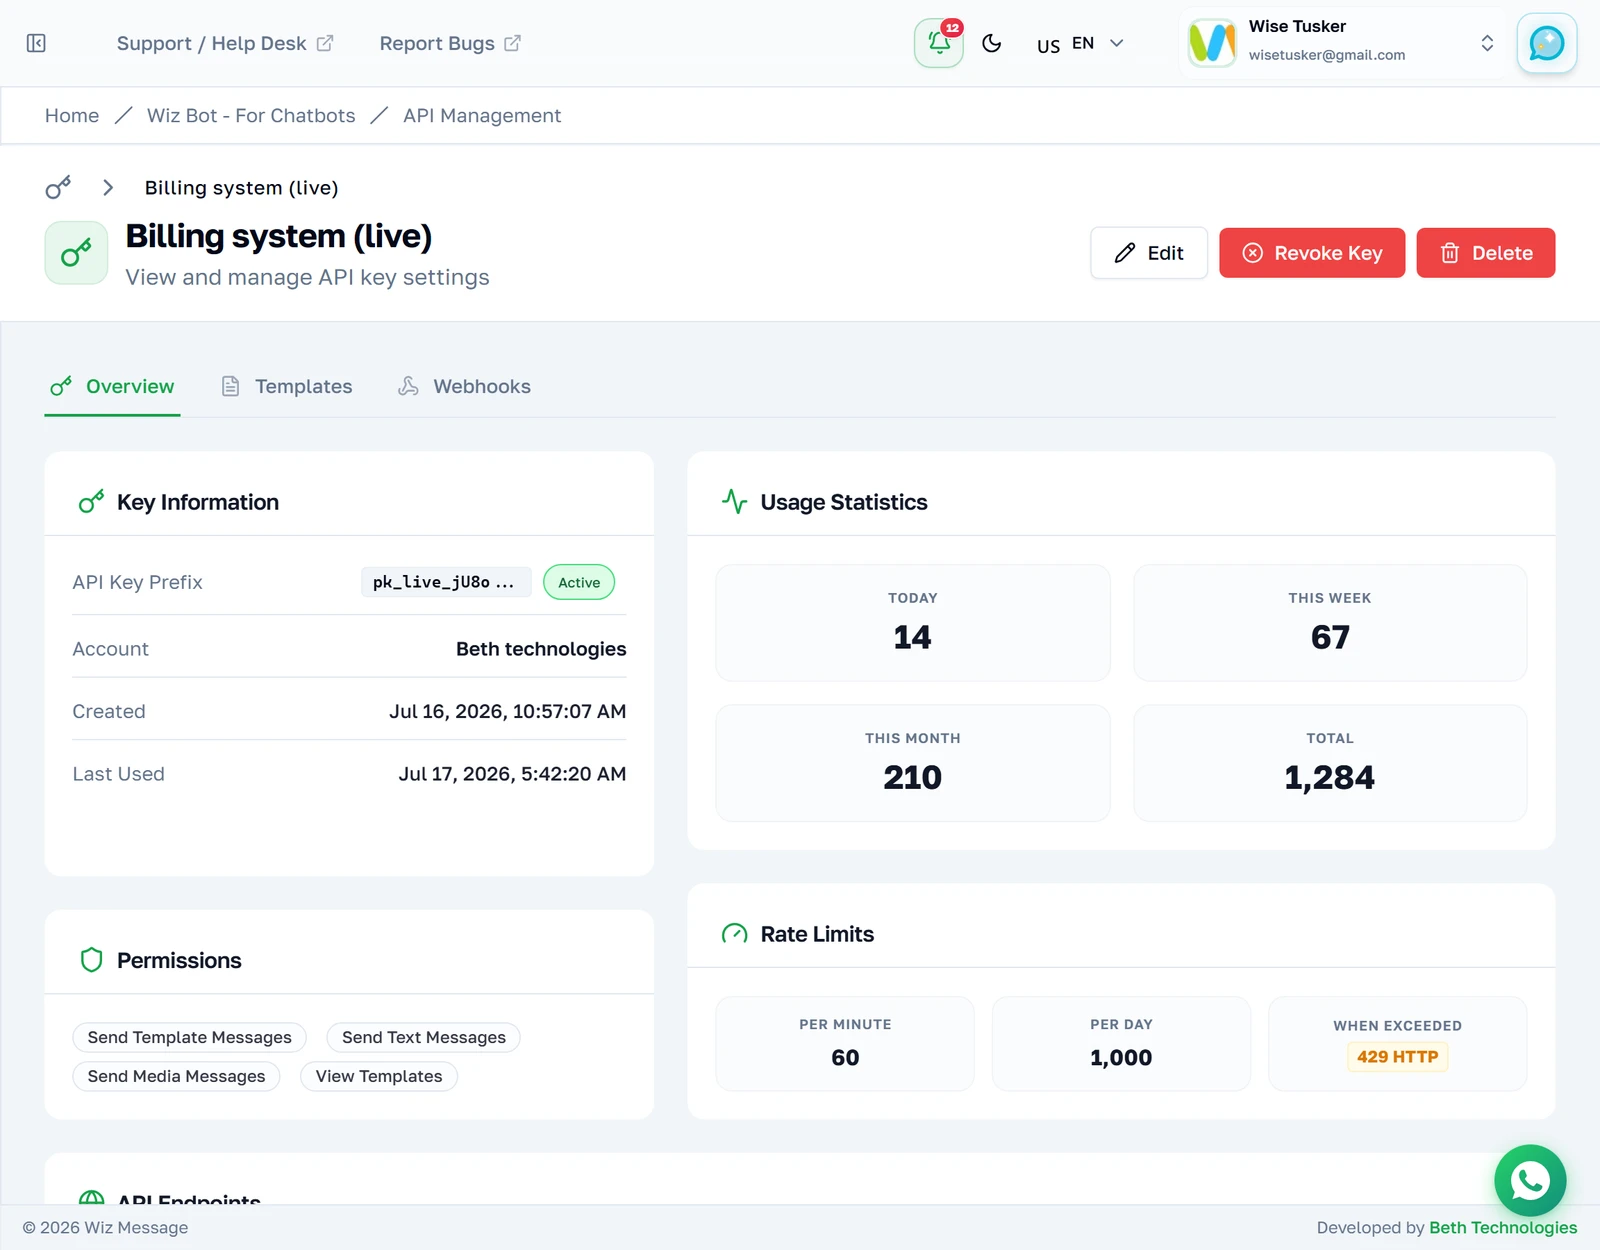
Opening a key lands on Overview: what it is allowed to do, how heavily it is being used, and the endpoints it can call. Usage counts are read from the request log, so they reflect real traffic.
What a key is allowed to do
The chips on Overview are the key's permissions. Each one gates a set of endpoints, and a call to an endpoint the key has no permission for is refused with a 403 before anything else happens.
The table below is the WizMessage API. The same chips gate the Meta Graph API. There, the single send endpoint reads its permission from the message body — Meta puts every message type on one path — while everything else reads it from the path and method, as here.
| Permission | What it gates |
|---|---|
send_text | POST /messages/text, /messages/reaction, /messages/contacts, /messages/interactive/list, /messages/interactive/button |
send_template | POST /messages/template, /messages/template/send |
send_media | POST /messages/media |
view_templates | GET /templates, /templates/:name |
view_messages | GET /media/:media_id |
manage_templates | Meta Graph API only — creating and deleting templates |
manage_profile | Meta Graph API only — business profile, QR codes, commerce settings, block list, phone settings, flows |
view_analytics | Meta Graph API only — template analytics |
New keys are created with all eight ticked, and existing keys were widened to match — so narrowing a key is now a deliberate untick on its edit form rather than something you have to remember to grant. Reactions have no permission of their own: they reuse send_text, on the reasoning that anything able to message a customer is able to react to them. See Sending a reaction from your software.
The last three gate nothing on this API. They exist for the account-management endpoints on the Meta Graph page, and are listed here because they appear on the same chips, on the same keys.
Note: Two endpoints are deliberately ungated, which surprises people auditing a key.
POST /media/uploadneeds no permission —send_mediacontrols sending a file to a customer, not putting one on Meta's servers.GET /messages/:uuidneeds none either: looking up the status of a message this key itself sent is always allowed. Neither widens what the key can reach, because every endpoint is still bounded by the key's own WhatsApp account.This applies to the WizMessage API only. On the Meta Graph surface, media upload and delete both require
send_media— that surface takes the stricter line. If you point an existing key at it and uploads start returning403, this is why.
A key that still needs setting up
A key with no template mapped opens on a Setup tab instead — the same wizard, inline. Note the tabs differ from the previous screenshot: until a key has at least one template, Templates and Webhooks are not offered, because there is nothing yet for them to act on.
Templates
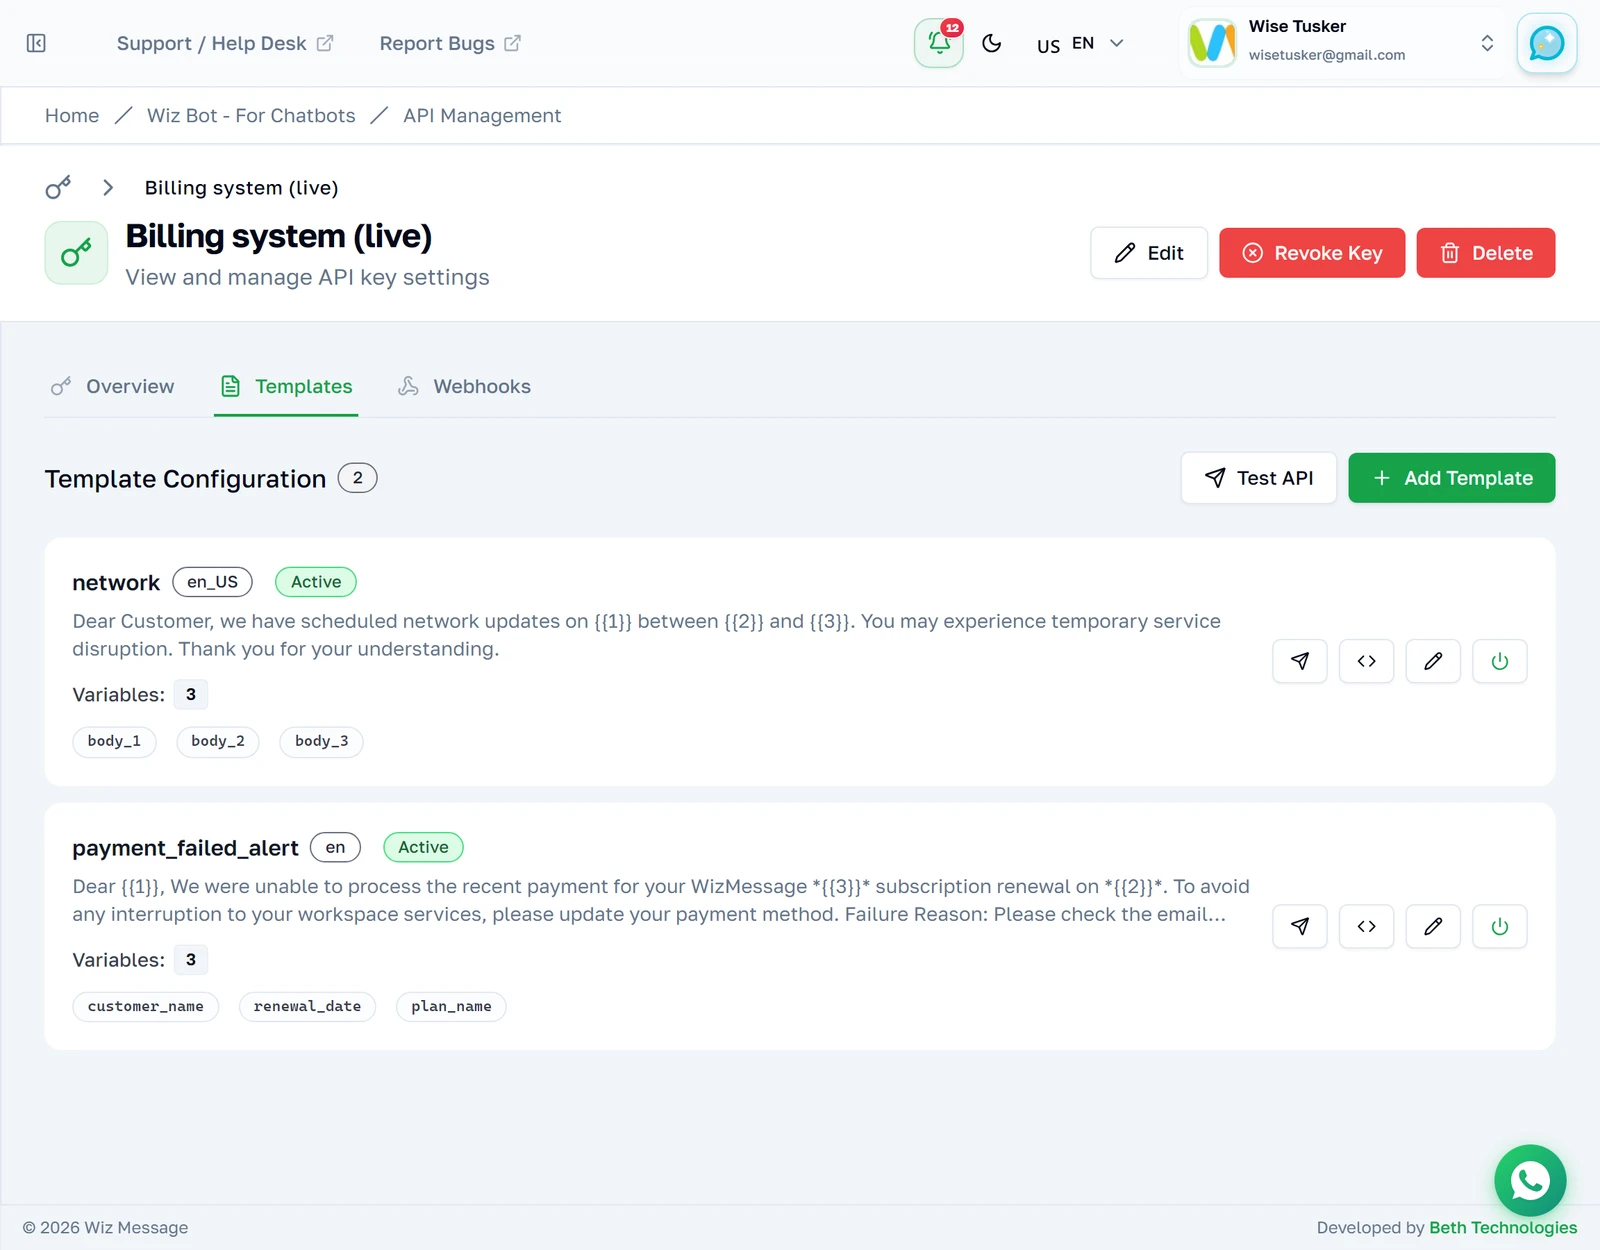
Each card is one template this key may send. The body text is the message as approved at Meta, and the chips beneath it are the variable names your system will supply. "Try it" sends a test, "Get code" produces a ready-made request in eight languages.
Reading the variables — the one thing worth slowing down for
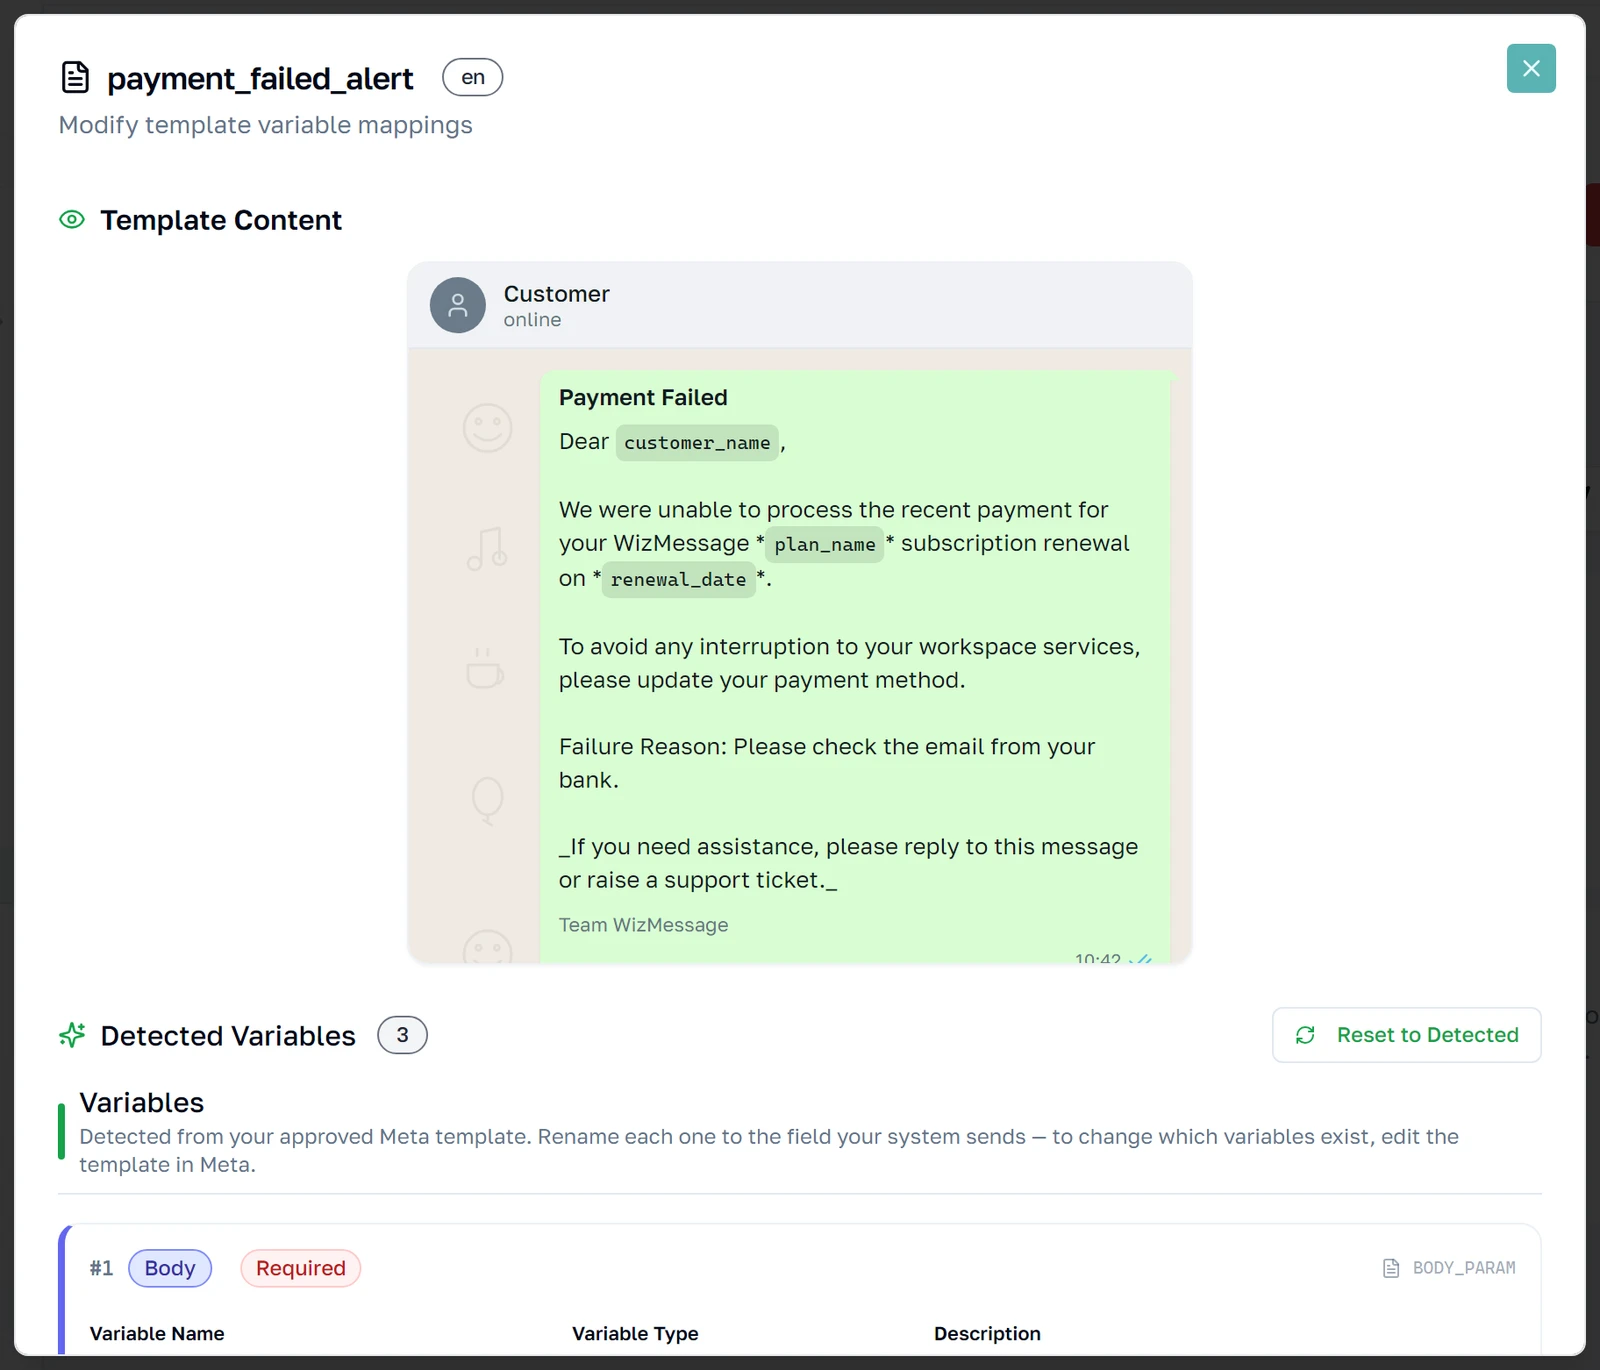
Look at the payment_failed_alert card. Its message runs {{1}}, then {{3}}, then {{2}} — the placeholders are NOT in numeric order in the text. The chips below are listed in numeric order: customer_name fills {{1}}, renewal_date fills {{2}}, plan_name fills {{3}}. Match your values to the NUMBER, never to the order the placeholders happen to appear in the sentence. This trips people up most often on translated templates, where word order moves the placeholders around.

The three buttons on every template
"Try it" — send a test without writing any code
The paper-plane button opens this template pre-loaded with sample values, one per variable name. It is the fastest way to check a mapping is right before your developers touch it. Note the toggle: "Simulate Only" is the default and nothing leaves the building — the server echoes your payload straight back. Flip it to "Send Real Message" and a genuine WhatsApp message goes to the number in the box, and is charged for.
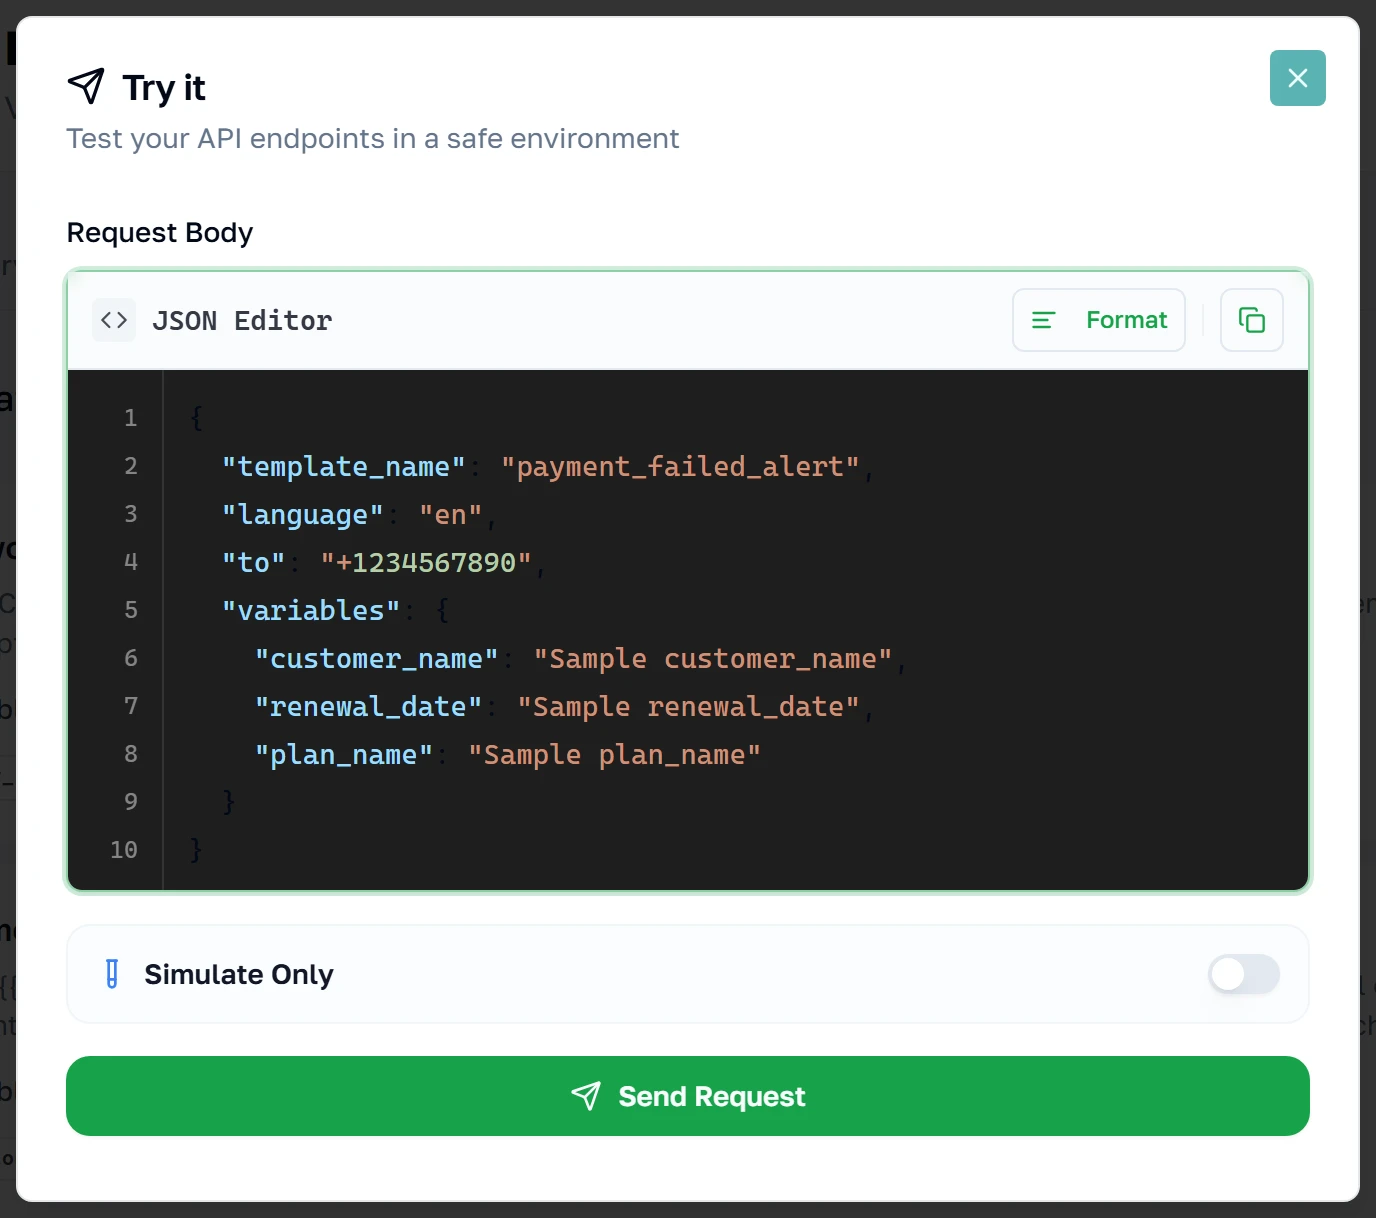
What a simulated send gives you back
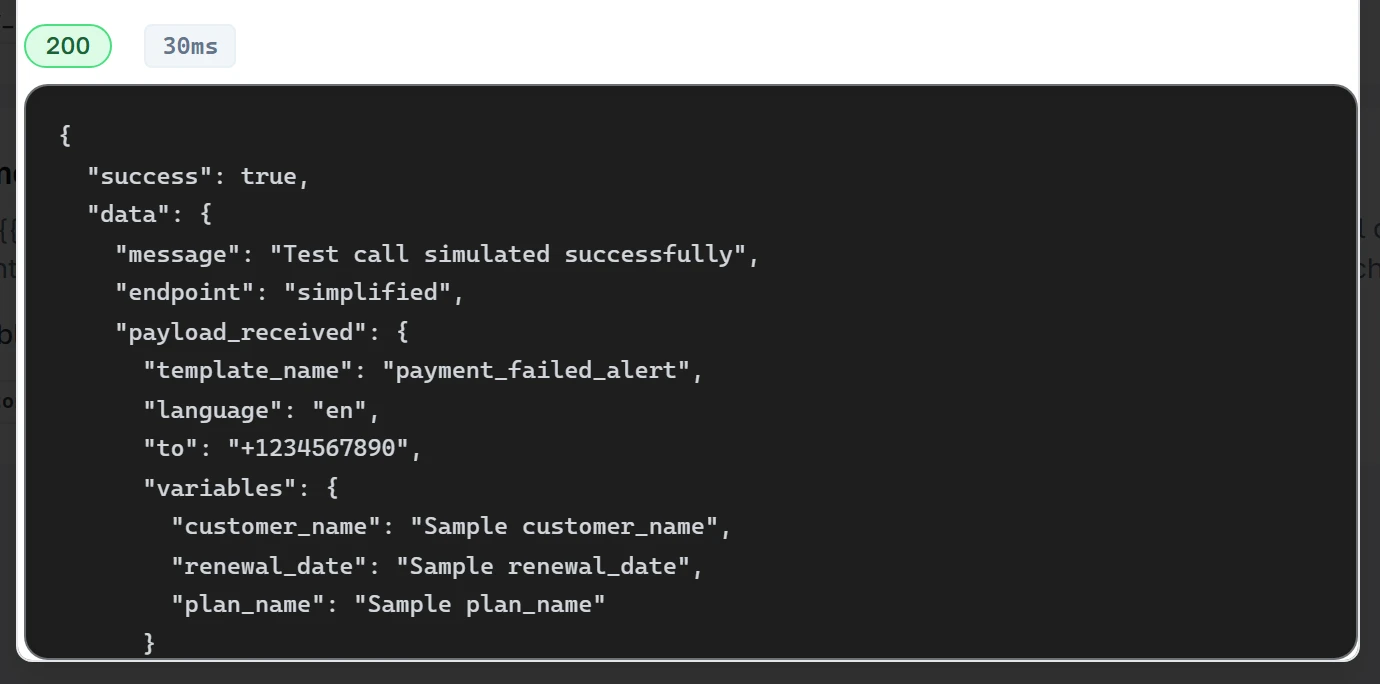
Pressing Send Request in Simulate Only mode returns the request as the platform received it, with the HTTP status and round-trip time. Read this as a shape check, not a rehearsal: it confirms your JSON parsed and the key was accepted, but it does NOT validate your variable names against the mapping and never contacts Meta. A payload that simulates cleanly can still be rejected for real. To prove the mapping itself, turn on Send Real Message and send to your own phone.
"Get code" — the request, written for you
The angle-brackets button generates a working request for this exact template in eight languages: cURL, JavaScript, Node.js, Python, PHP, Ruby, Go and C#. Hand it to whoever is writing the integration. The variables appear as {{placeholders}} named after your mapping, and the credentials are left as YOUR_API_KEY / YOUR_API_SECRET — this dialog never prints your real key, so the snippet is safe to paste into a ticket.
An API Format control at the top picks which surface the snippet targets: WizMessage produces the request documented on this page, Meta Graph produces Meta's shape — a Meta-formatted body posted to /v26.0/{phone-number-id}/messages with a bearer token. Switching format regenerates the snippet.
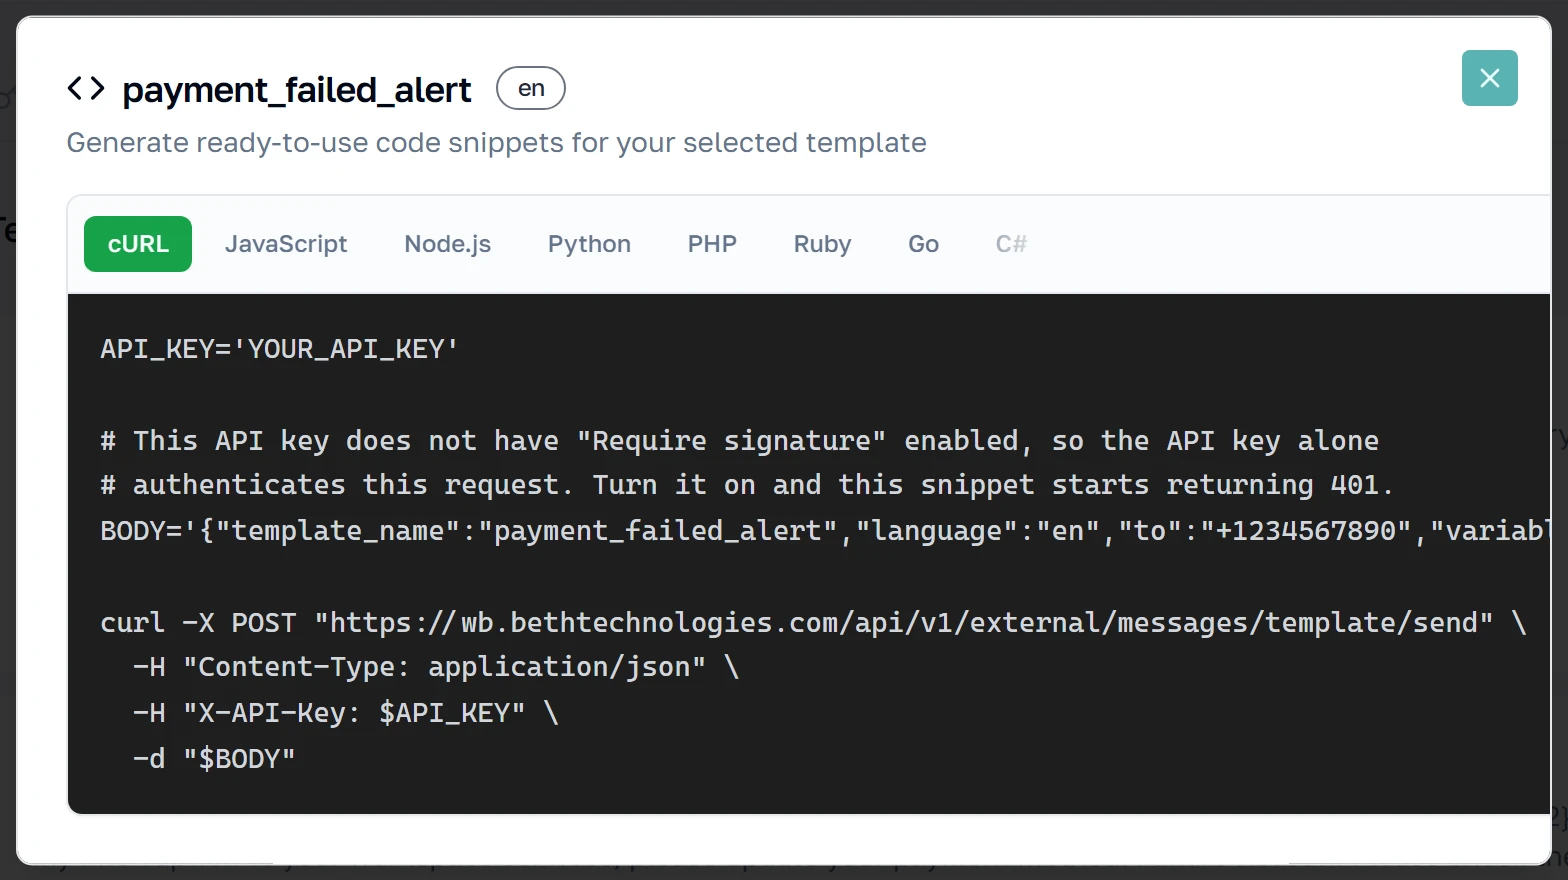
Switching language
Click any language along the top and the snippet is rewritten for it — the same call, the same headers, that language's HTTP client. Each one is generated the first time you click it, so a brief spinner on first switch is normal. Copy takes the snippet as shown: it is complete, imports and all, and if this key requires signatures the signing step is already in it.
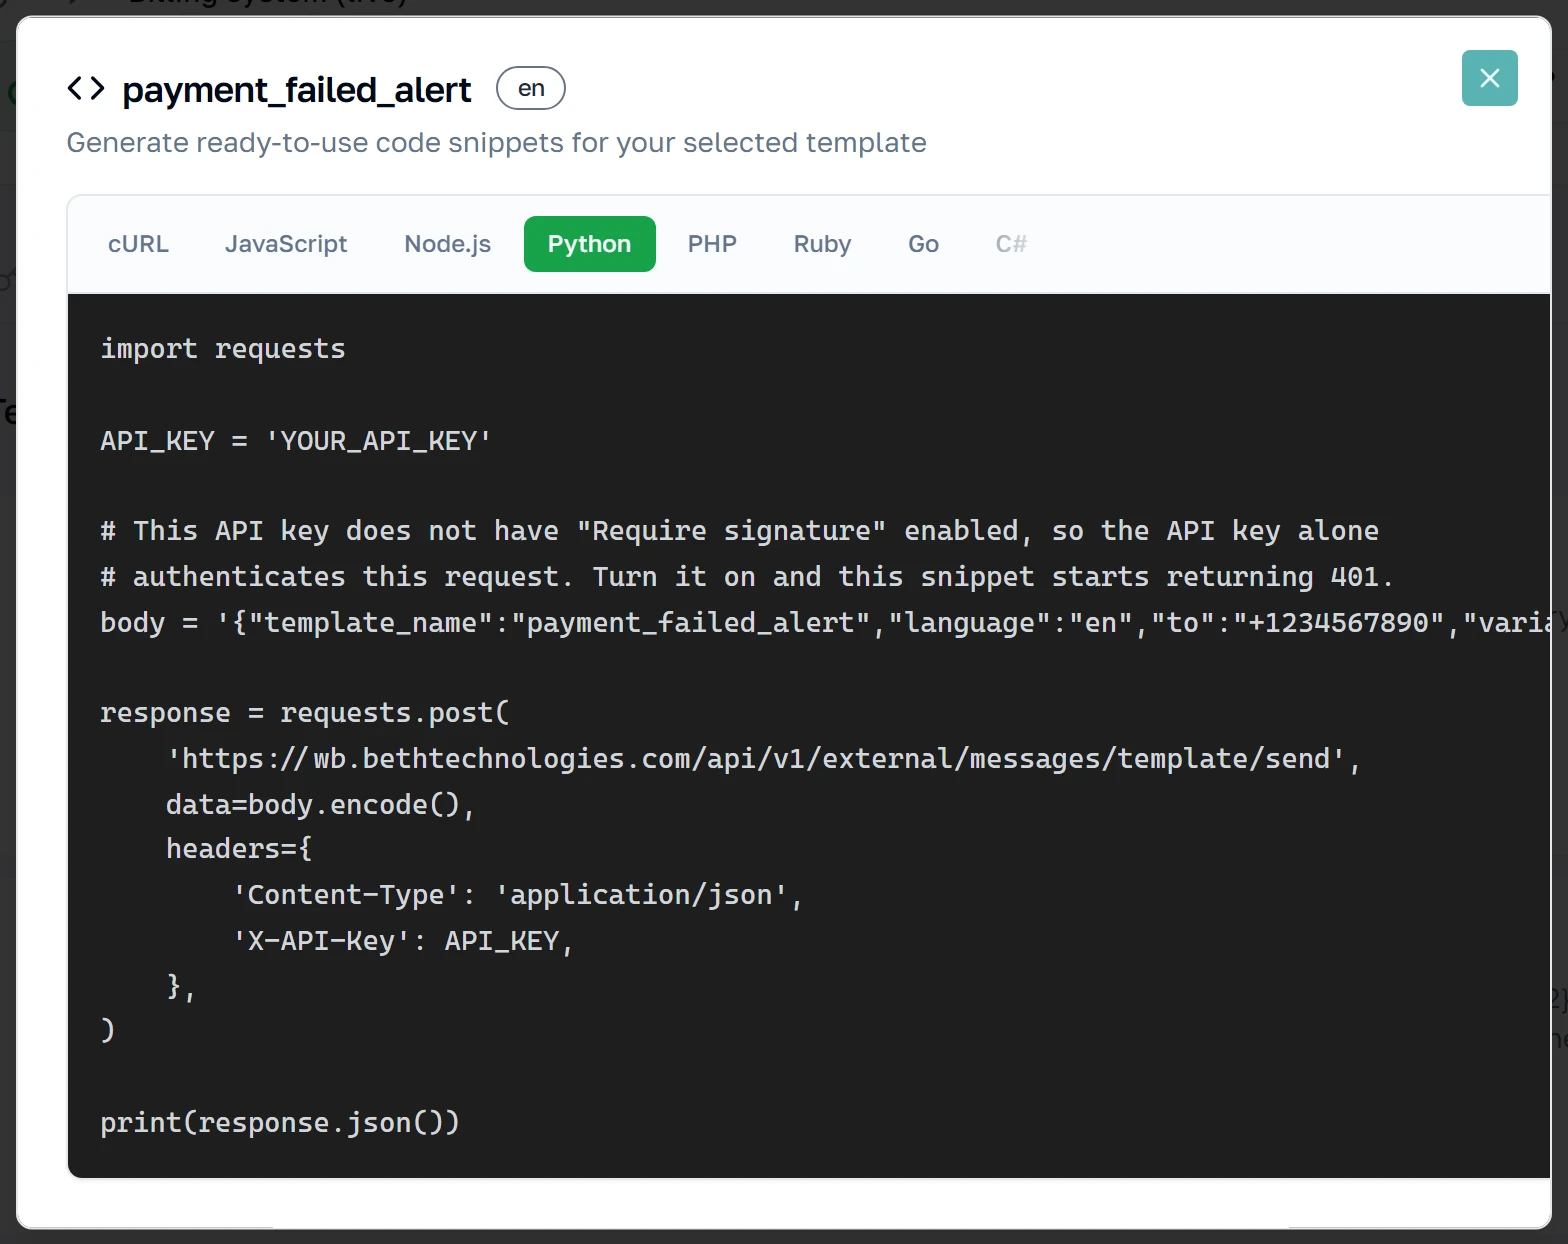
"Edit" — change what your system sends
The pencil opens the mapping itself. The phone mock-up at the top is the real message with your current names substituted in, so you can see what the customer will read. Beneath it, each detected variable can be renamed, reordered, marked required, or given a type — a date, a currency amount, an image. Renaming a variable renames it in your API payload too, so a system already sending the old name will start failing: change both together.
Test API — the same tool, any endpoint
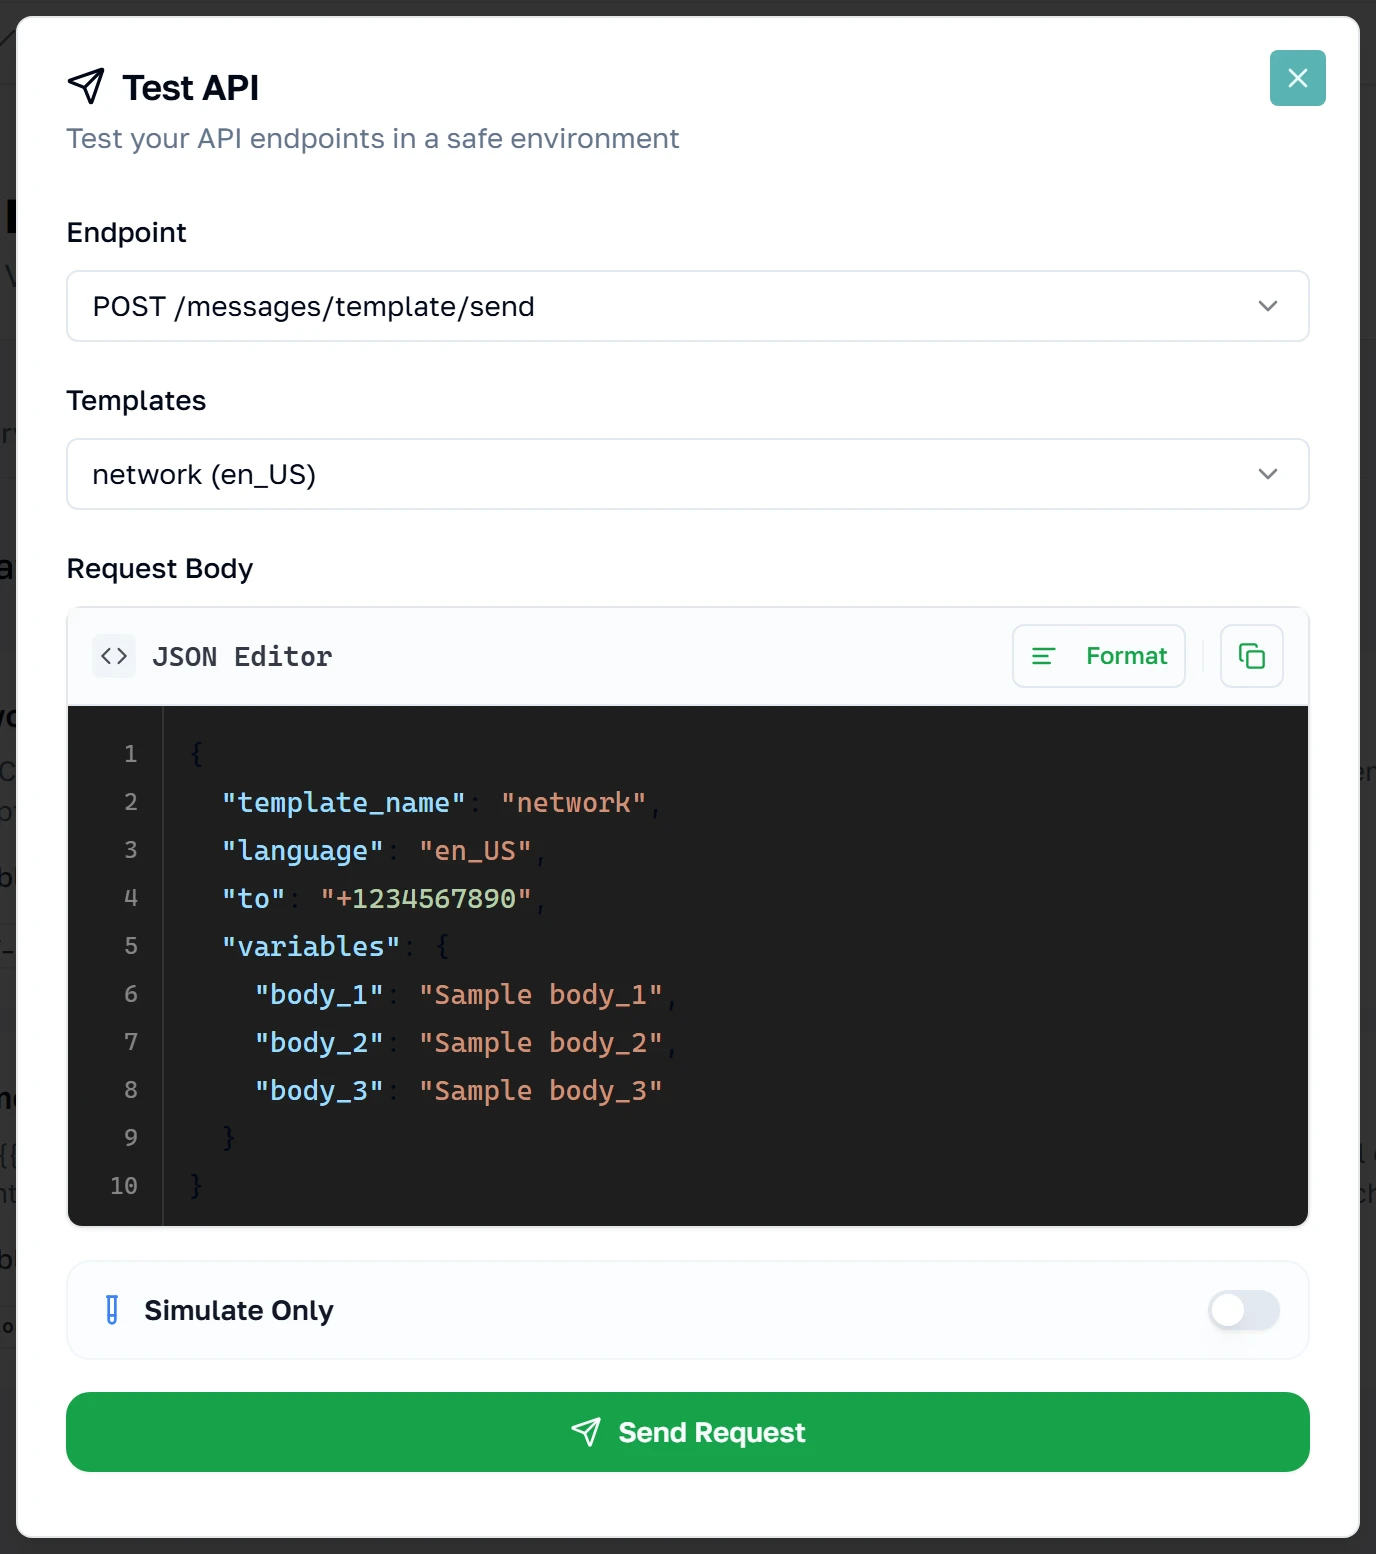
"Test API" at the top of the tab is "Try it" without the template lock: pick any of the four send endpoints — /messages/template/send, /messages/text, /messages/template, /messages/media — switch templates from the second dropdown, and edit the body freely. Use it to check the raw /messages/text or /messages/template calls, which have no card of their own because they are not tied to a mapping. Note this template's variables are still called body_1, body_2, body_3 — that is what an unmapped template looks like, and it is what "Edit" exists to fix.
This dialog carries the same API Format control. Those four endpoints exist in WizMessage format; switch to Meta Graph and the endpoint picker is replaced by the single target that surface uses, POST /v26.0/{your phone number id}/messages, with a Meta-shaped body pre-filled.
Replies
Webhooks — getting replies back
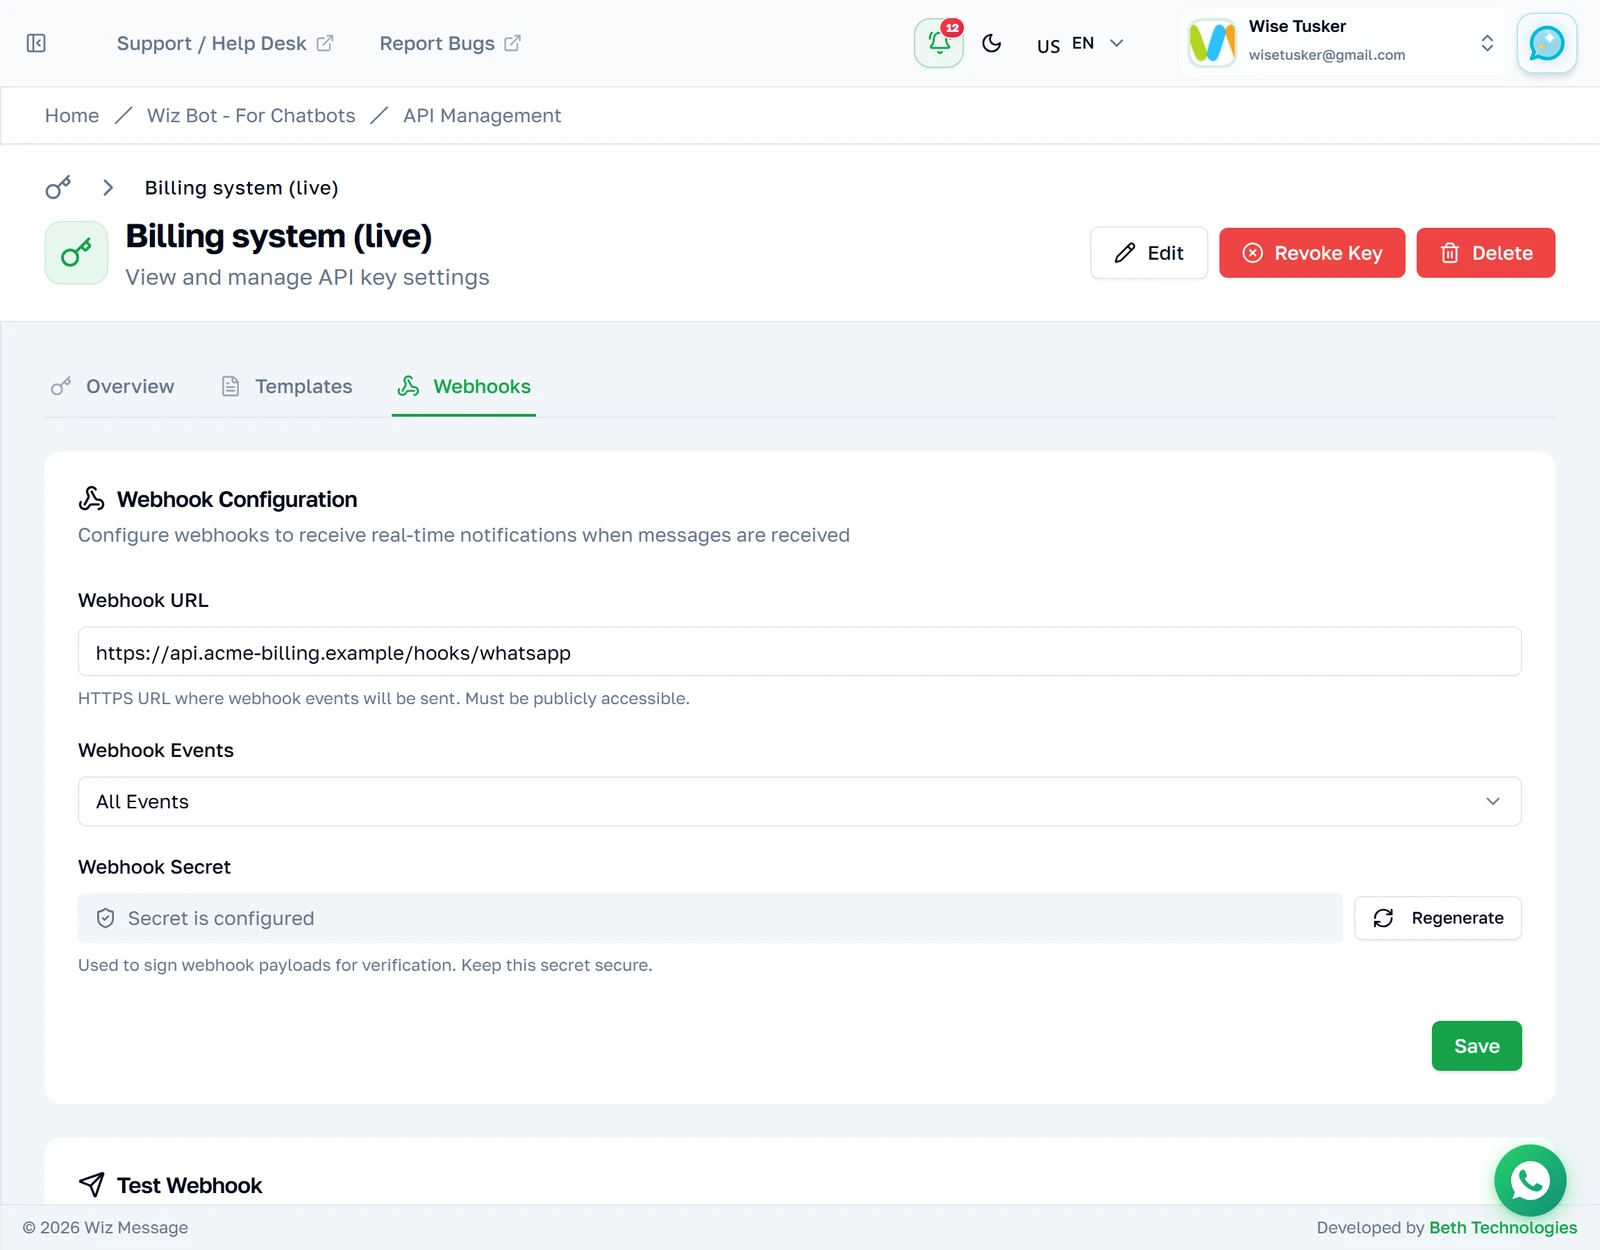
Sending is only half an integration. Point a webhook at your own HTTPS endpoint and WizMessage will POST inbound messages and delivery updates to it. The signing secret is shown once when generated; verify it on every delivery so you know the call really came from us.
The tab also offers a payload format. Everything in this section describes the WizMessage format — our {version, event, timestamp, data} payload. Choosing Meta Graph instead forwards Meta's own webhook envelope untouched, with a different signature scheme and a different way of choosing what you receive; that is documented on the Meta Graph API page.
Which events you receive
Tick the events this endpoint should receive. Each one arrives as its own POST.
| Event | When it fires |
|---|---|
message.received | A customer sent you a message. |
message.reaction | Someone added or removed an emoji reaction. Fires in both directions — see Reactions. |
message.sent | A message went out — from the API, from the web dashboard, or typed on the business's own phone. data.source tells you which. |
message.delivered | The message reached the recipient's device. |
message.read | The recipient opened it. |
message.failed | The send or delivery failed; data.error carries the reason. |
Note:
message.receivedand inboundmessage.reactionare only delivered when the account's chatbot system is set to Webhook. Set to anything else, inbound messages go to the bot instead and your endpoint is never called — the Webhooks tab warns you when this applies. Reactions the business itself sends (direction: "outbound") are unaffected by this setting.This gate applies to the WizMessage payload format only. A key set to Meta Graph format receives inbound messages regardless of the account's chatbot system — configuring a URL and subscribing to a field is the whole opt-in there.
Note: Reactions the business sends from its own phone used to arrive as
message.sentwith the body"[Unsupported message type]". They now arrive asmessage.reactionwithdirection: "outbound". Tick the new event if you were relying on those.
Deliveries are at-least-once. Dedupe on event together with data.message_id rather than on the X-Webhook-Id header alone, and reply 2xx quickly.
Note: Only ticked events are ever sent. If your endpoint is receiving replies but no delivery reports, this is almost always why —
message.deliveredandmessage.readare separate ticks frommessage.received.
message.received and message.sent both carry a media block when the message was a file, but the metadata on it differs by origin. An inbound message carries mime_type and usually sha256. A message.sent from your own API call carries neither — you supplied the media, so we do not repeat it back. A message.sent echoed from the business's own phone carries them only when WhatsApp included them, which is not always. Read data.source to know which you are holding; never infer the origin from which fields happen to be present.
What an inbound message looks like
This is what lands on your endpoint when a customer sends you an image. Every inbound message has this shape — only the message block changes with the type.
{
	"version": 1,
	"event": "message.received",
	"timestamp": "2026-08-01T05:56:49.000+00:00",
	"data": {
		"message_id": "wamid.HBgMOTE4MjgxMTI2OTU2FQIAEhggQUNEMTQx…",
		"to": "",
		"message": {
			"type": "image",
			"image": {
				"id": "4603890099896453",
				"caption": "[Image]",
				"mime_type": "image/jpeg",
				"sha256": "k3XrOe9vQZ1sYb2Lp8mNc4TdWfHgJkRuAiOsDxFvBnE="
			}
		},
		"from": "918281126956",
		"user_id": "IN.983887744040064",
		"contact": {
			"name": "Priya Sharma",
			"wa_id": "918281126956",
			"user_id": "IN.983887744040064"
		}
	}
}
| Field | Always there? | What it is |
|---|---|---|
data.message_id | Yes | The inbound message's wamid. |
data.to | Yes — but always empty | See the note below. |
data.message | Yes | The block described under Which block you get. |
data.from | Only when WhatsApp sent a number | The customer's phone number. |
data.user_id | Only when WhatsApp sent one | The customer's WhatsApp user id. |
data.username | Only when the customer has one | The customer's WhatsApp username. |
data.contact | Only when any identity is known | name, plus wa_id / user_id / username when we have them. name falls back to the username, then the phone number, then the user id. |
Note:
data.tois always an empty string onmessage.received. The recipient is your own business number, which you already know. Do not key on it, and do not generalise this — onmessage.sentthe same field carries the real recipient.
Which block you get
The message block is named after the type, and there are only three families to handle.
For media, the block carries the file's identity — never a URL:
| Field | On which types | What it is |
|---|---|---|
id | All media | Meta's media ID. Fetch the bytes with it — see Reading files people send you. |
mime_type | All media | The real type, image/jpeg or application/pdf. |
sha256 | All media, when WhatsApp sends it | Content hash. Useful for deduping the same file sent twice. |
filename | Documents only | The name as the sender's device had it. This is the name to save the file under. |
caption | All media | The sender's caption — or a placeholder. Read the note below before trusting it. |
Note:
captionmay be a placeholder you were never sent. On an image or video you get the real caption when there was one, and"[Image]"/"[Video]"when there was not. On audio and stickers it is always"[Audio]"/"[Sticker]"— WhatsApp carries no caption on those types at all, so it is never real. On a document with no caption you get the filename instead, and only"[Document]"when there is not even that. So on a document,captionequal tofilenamemeans there was no caption.
Note: Locations and contacts are not structured.
typeis"location", but the payload carriestext.bodyholding a sentence —Location: 12.97, 77.59 (Head office) - MG Road, where the name and address parts appear only if WhatsApp sent them. Contacts arrive the same way, asContact: Priya Sharma, comma-separated for several andUnknownfor a contact with no name on it. Switch on the type; do not expect fields to parse out of the body.
Verifying the signature
Every delivery is signed with the webhook signing secret you were shown when the key was created. Verify it on each request: it is the only thing proving the call came from us and not from someone who guessed your URL.
| Header | Value | Formats |
|---|---|---|
X-Webhook-Signature | HMAC-SHA256 of timestamp + "." + rawBody, keyed on your webhook signing secret, lowercase hex. | WizMessage only |
X-Webhook-Timestamp | Unix timestamp in seconds. Part of the signed string — reject deliveries older than a few minutes to stop replays. | WizMessage only |
X-Webhook-Event | The event name, matching the table above. | Both |
X-Webhook-Id | Unique id for this delivery attempt. | Both |
Note: A key set to Meta Graph format signs differently —
X-Hub-Signature-256, over the raw body with no timestamp, exactly as Meta does. The last two headers above are still sent, so the dedupe contract is unchanged. See Verifying the signature on that page, and keep the two verifiers separate if you run both formats against one server.
Sign the raw request body exactly as received. Parsing the JSON and re-serialising it changes key order and spacing, and the signature will never match.
const crypto = require('node:crypto')

// express: app.post('/webhooks', express.raw({ type: 'application/json' }), ...)
function verify(req) {
	const timestamp = req.get('X-Webhook-Timestamp')
	const provided = req.get('X-Webhook-Signature')

	const expected = crypto
		.createHmac('sha256', WEBHOOK_SIGNING_SECRET)
		.update(timestamp + '.' + req.body) // req.body is the raw Buffer, not a parsed object
		.digest('hex')

	// Constant-time compare — a plain === leaks timing information.
	const a = Buffer.from(expected, 'hex')
	const b = Buffer.from(provided, 'hex')
	return a.length === b.length && crypto.timingSafeEqual(a, b)
}
Note: This is a different secret and a different key derivation from the request signing above. Outbound webhooks are keyed on the webhook signing secret itself; inbound API requests are keyed on
SHA256(api_secret). Using the wrong one is the usual cause of a signature that never matches.
When your endpoint does not return 2xx
We wait up to 10 seconds for a response, and never follow redirects.
| Your response | What we do |
|---|---|
2xx | Delivered. Done. |
5xx, 408, 429, timeout, connection error | Retried — after 1s, 5s, 30s, then 5min. Five attempts in total, then the event is given up on. |
Any other 4xx (400, 401, 403, 404…) | Permanent failure. Not retried. If your signature check rejects a delivery, that event is gone. |
410 Gone | Webhooks are switched off on this key. Nothing further is sent until you re-enable them in the dashboard. Only return this if you mean it. |
Because a 4xx is never retried, prefer returning 2xx and queueing the work on your side. Reserve rejection for genuinely bad input.
REST API reference
Everything above configures the key. This is what your developers actually call. Base URL is https://wizmessage.com/api/v1/external. Every endpoint requires the auth headers below and is subject to the key's rate limits.
Authenticating
Send your API key on every request, in either of the two accepted headers. If the key has "Require signature" enabled, you must also sign the request — and a key with it enabled will reject any unsigned call outright.
| Header | Value |
|---|---|
Authorization | Bearer pk_live_… — your full API key. The preferred form, and the one the Meta Graph API expects. |
X-API-Key | The same key, sent the original way. Still accepted everywhere; send this or Authorization, not both. |
X-Timestamp | Unix timestamp in seconds. Rejected if more than 5 minutes from server time. |
X-API-Signature | HMAC-SHA256 of timestamp + "." + rawBody, keyed on SHA256(api_secret), lowercase hex. |
Note: Signatures are only enforced when the key has
require_signatureenabled. If it does not, the API key alone is sufficient to send messages — which is exactly why the key is a secret, not an identifier. Treat it like a password: it is shown once, and anyone holding it can message your customers.
const crypto = require('node:crypto')

const body = JSON.stringify({ to: '+919876543210', message: 'Hello' })
const timestamp = Math.floor(Date.now() / 1000).toString()

const secretHash = crypto.createHash('sha256').update(API_SECRET).digest('hex')
const signature = crypto.createHmac('sha256', secretHash)
	.update(timestamp + '.' + body)
	.digest('hex')

await fetch('https://wizmessage.com/api/v1/external/messages/text', {
	method: 'POST',
	headers: {
		'Content-Type': 'application/json',
		'X-API-Key': API_KEY,
		'X-Timestamp': timestamp,
		'X-API-Signature': signature,
	},
	body,
})
Endpoints
| Method | Path | Purpose |
|---|---|---|
POST | /messages/text | Send a plain text message. Only works inside an open 24-hour conversation window. |
POST | /messages/media | Send a document, image, video or audio file. Only works inside an open 24-hour conversation window. |
POST | /messages/reaction | React to a message with an emoji, or remove a reaction you sent. |
POST | /messages/contacts | Send one or more contact cards. Only works inside an open 24-hour conversation window. |
POST | /messages/template | Send a template, supplying Meta's raw components array yourself. |
POST | /messages/template/send | Send a template using the mapping you configured in the dashboard. This is the one to use. |
POST | /messages/interactive/list | Send an interactive list message. |
POST | /messages/interactive/button | Send up to three reply buttons. |
GET | /messages/:uuid | Look up the delivery status of a message you sent. |
POST | /media/upload | Upload a PDF/image/video to Meta and get a media_id for use in a template header. |
GET | /media/:media_id | Download a file someone sent you, using the media id from a webhook. Needs view_messages. |
GET | /templates | List the templates available to this key. |
GET | /templates/:name | Fetch one template's details. |
Two ids, and which is which
Every successful send returns both ids. They are not interchangeable, and the field named message_id does not mean the same thing in a response as it does on a webhook.
{
	"success": true,
	"data": {
		"message_id": "85db3ac6-de11-48ed-9730-a38cc410dc79",
		"whatsapp_message_id": "wamid.HBgMOTE4MjgxMTI2OTU2FQIAERgUQ0Uz…",
		"status": "sent"
	}
}
| Id | What it is | Use it for |
|---|---|---|
message_id | Ours. The handle this send is filed under. | GET /messages/:uuid — pass this value. |
whatsapp_message_id | WhatsApp's own id (a wamid). | Matching up webhooks: this is what arrives as data.message_id on message.sent, message.reaction, message.delivered, message.read and message.failed. |
So a webhook's data.message_id lines up with the response's whatsapp_message_id, not with its message_id. If you only store one, store whatsapp_message_id — or set your own reference, which is echoed back on every webhook and is the simplest thing to key on.
Note: Status webhooks may also carry
data.provider_message_id. WhatsApp has begun re-encoding message ids partway through a message's life, so the id it puts on a delivery report is not always the id it gave you at send time. We resolve that for you —data.message_idis always the send-time id you already hold.provider_message_idis WhatsApp's raw value, useful for support tickets; do not match on it.
Sending a mapped template
This is the payload that pairs with the Templates tab. You send variables by NAME — the names shown as chips on the template card — and the platform assembles Meta's components for you. That is the whole point of mapping a template: your billing system does not need to know anything about Meta's component format.
POST /api/v1/external/messages/template/send

{
	"to": "+919876543210",
	"template_name": "payment_failed_alert",
	"language": "en",
	"variables": {
		"customer_name": "Priya Sharma",
		"renewal_date": "12 Aug 2026",
		"plan_name": "Wiz Pro"
	},
	"reference": "invoice-2026-0817"
}
Note: The variable names must match the mapping exactly — an unrecognised name is ignored, and a missing required one is rejected with a
400.referenceis yours: it is echoed back on webhooks so you can tie a delivery report to a record in your own system.
Rate limits
Each key carries its own limits, visible on the Overview tab — 60 requests/minute and 1,000 messages/day by default. Responses include the remaining allowance, so back off when it runs low rather than retrying into a wall.
Sending files with the API
Inside an open 24-hour window your software can send a file directly — no template, no approval. One endpoint covers documents, images, video and audio.
What you can send
The type you name in the request decides the limits. Anything larger, or in a format not listed, is refused before it reaches WhatsApp.
| Type | Formats | Max size | Caption | Filename |
|---|---|---|---|---|
document | pdf, doc, docx, xls, xlsx, ppt, pptx, txt | 100 MB | ✓ | ✓ |
image | jpg, jpeg, png, webp | 5 MB | ✓ | — |
video | mp4, 3gp | 16 MB | ✓ | — |
audio | aac, amr, mp3, ogg, m4a | 16 MB | — | — |
POST /api/v1/external/messages/media

{
	"to": "+919876543210",
	"type": "document",
	"link": "https://example.com/invoice-2026-0817.pdf",
	"filename": "Invoice 2026-0817.pdf",
	"caption": "Your invoice for August",
	"reference": "invoice-2026-0817"
}
Upload once, send many times
If you send the same file repeatedly — a price list, a catalogue, a terms PDF — upload it once and keep the id. It stays valid for 30 days and saves WhatsApp re-fetching your URL on every message.
POST /api/v1/external/messages/media

{
	"to": "+919876543210",
	"type": "image",
	"media_id": "1234567890",
	"caption": "This month’s catalogue"
}
When a send is refused
- Outside the 24-hour window. Freeform media needs an open conversation. Send an approved template instead — see the shared inbox guide for how the window works.
- The key lacks
send_media. Check the permission chips on the key's Overview tab. - A caption on audio. WhatsApp does not show one, so it is rejected rather than silently dropped.
- A filename on anything but a document. Only documents display a name.
- Neither
media_idnorlink. Exactly one is required.
Note: You can try all of this without writing code. Open the key, press Test API, and pick
POST /messages/mediafrom the endpoint list — the body is pre-filled and "Get code" will write the same request in eight languages.
Reading files people send you
When a customer sends you a photo or a PDF, the webhook gives you a media id — not a link. This endpoint turns that id into the actual file.
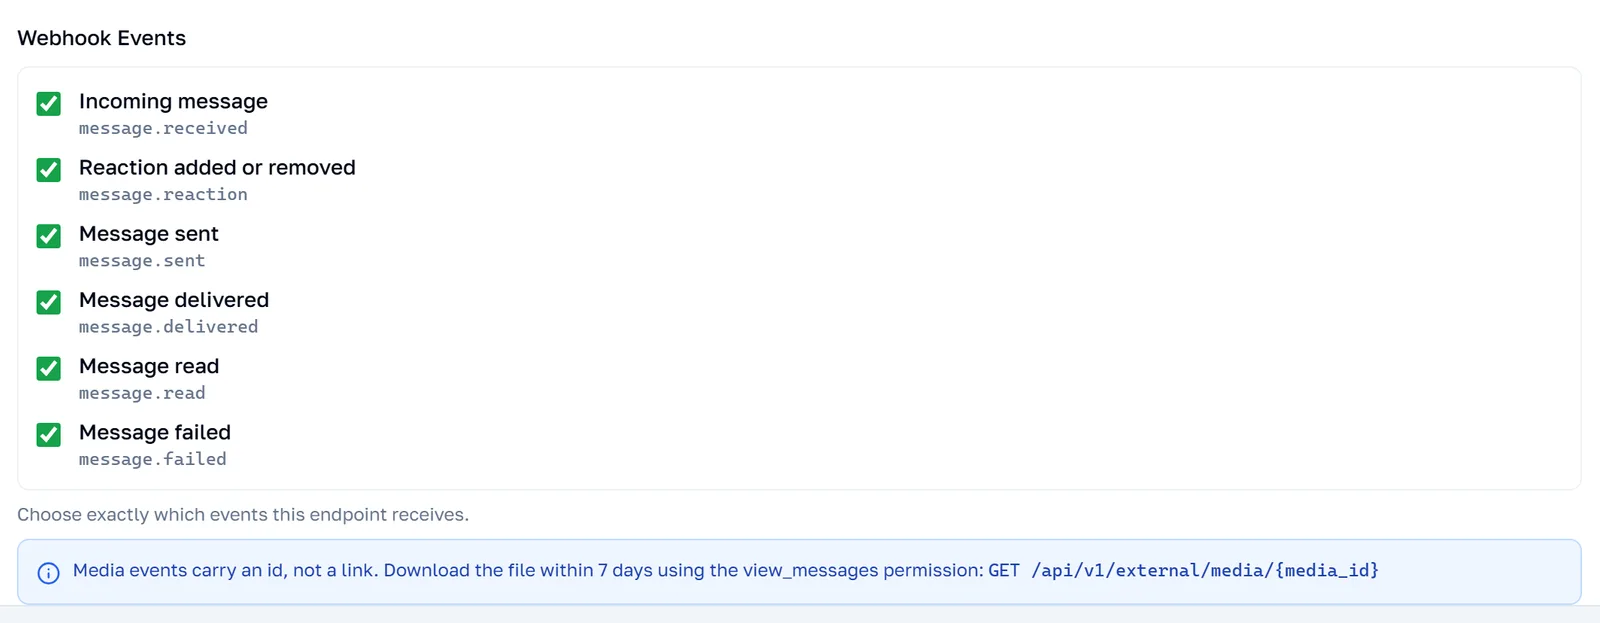
The key's Webhooks tab says so too, whenever the endpoint is subscribed to an event that can carry a file.
Why there is no URL in the payload
image.id is Meta's identifier for the file, and it is the only thing WhatsApp puts in the webhook. Turning it into bytes takes two steps you cannot perform yourself: asking Meta for a temporary URL, which requires your WhatsApp account's business token, and then downloading from that URL, which requires the same token again. The URL is also only valid for about five minutes. An API key holds neither the token nor the URL, which is what this endpoint exists to bridge.
Fetching the file
The response body is the file — there is no JSON envelope around it. Errors are still JSON, in the usual shape, so branch on the status code rather than trying to parse every response.
curl -sS -o invoice.pdf -D headers.txt \
	-H "X-API-Key: $API_KEY" \
	-H "X-Timestamp: $TIMESTAMP" \
	-H "X-API-Signature: $SIGNATURE" \
	https://wizmessage.com/api/v1/external/media/4603890099896453
| Response header | What it holds |
|---|---|
Content-Type | Meta's type for the file, or application/octet-stream when Meta sent none. |
Content-Length | Only when Meta declared one. Do not require it — see the truncation note below. |
Cache-Control | private, max-age=300. The response is specific to your key; never put it in a shared cache. |
Content-Disposition | inline; filename="<the media id>" — not the original filename. For a document the real name arrived on the webhook as document.filename; save it under that. |
How long a media id lasts
This is the detail that breaks integrations written months earlier. The id you receive on a webhook does not last as long as the ones you create yourself.
Fetch what you need and store the bytes on your side. Treating the media id as a permanent handle works for a week and then quietly stops.
When a fetch is refused
Errors come back as the standard envelope — { "success": false, "error": { "code", "message" } }.
| Status | code | What happened |
|---|---|---|
400 | INVALID_MEDIA_ID | Not a Meta media id. Checked before anything else, so nothing was called. |
401 | INVALID_API_KEY, INVALID_SIGNATURE, TIMESTAMP_EXPIRED… | The usual auth failures, identical to every other endpoint. |
403 | PERMISSION_DENIED | The key does not have view_messages. Tick it on the key's edit form. |
404 | MEDIA_NOT_FOUND | Unknown, expired past 7 days, or belonging to another account. These are deliberately indistinguishable — a different answer for each would confirm an id exists. |
404 | COEXT_ACCOUNT_NOT_FOUND | The WhatsApp account behind this key is gone. |
400 | COEXT_ACCOUNT_NOT_CONFIGURED, PHONE_NUMBER_ID_MISSING, BUSINESS_TOKEN_MISSING | The account is not in a state that can talk to WhatsApp. Fix it in the dashboard — retrying will not help. |
413 | MEDIA_TOO_LARGE | Larger than the 32 MB limit, when the size is known in advance. See below. |
429 | RATE_LIMIT_EXCEEDED, DAILY_LIMIT_EXCEEDED | A download spends the key's allowance exactly like a send does. |
502 | MEDIA_DOWNLOAD_FAILED | WhatsApp's file host answered with something that was not the file. Worth retrying. |
Note: The size limit only produces a clean
413when WhatsApp tells us the size up front. When it does not, the limit is enforced while the file is streaming — and by then the200and its headers have already been sent, so the connection simply ends early. You get a truncated file with a200status and no error body. Compare the bytes you received againstContent-Lengthwhenever it is present, and treat a short read as a failure rather than a file.
Three more things worth knowing before you build on this:
- The 32 MB limit is lower than WhatsApp's own. A document may be up to 100 MB, so a file you can send through this API is not necessarily one you can read back through it.
- Downloads count against your quota — both the per-minute and the daily limit. Fetching media for a thousand inbound messages exhausts a default key's day on its own.
- A
GEThas no body to sign. If your key requires signatures, the HMAC on this endpoint covers the timestamp alone. That still proves you hold the key and limits replays to five minutes, but it does not authenticate the media id or the path.
Note: Unlike the send endpoints, this one is not in the Test API dialog — that tool covers the
POSTendpoints only. To try it by hand, take a media id from a webhook you have already received and use thecurlabove; the file lands in the file you name with-o.
Reactions
A reaction is the emoji someone taps onto a single message — 👍 on an order confirmation, ❤️ on a photo. It is not a message of its own: it points at one. Your software can read reactions as they happen, and send them.
One event, three origins
A reaction can come from your customer, from the owner tapping it on the Business app phone, or from your own software calling the API. All three arrive on the same message.reaction event, so one handler covers every case — direction and source tell you which you are looking at.
What a reaction webhook looks like
This is a customer adding 👍 to a message you sent them.
{
	"version": 1,
	"event": "message.reaction",
	"timestamp": "2026-08-01T09:14:22.031Z",
	"data": {
		"message_id": "wamid.HBgMOTE5ODc2NTQzMjEwFQIAERgSQjkz…",
		"direction": "inbound",
		"from": "+919876543210",
		"to": "+911122334455",
		"reaction": {
			"message_id": "wamid.HBgMOTE5ODc2NTQzMjEwFQIAERgUQ0Uz…",
			"emoji": "👍",
			"action": "added"
		},
		"contact": {
			"name": "Priya Sharma",
			"wa_id": "919876543210"
		}
	}
}
There are two message_ids in that payload and they are not the same thing. This is the one field worth reading twice.
| Field | What it is |
|---|---|
data.message_id | The reaction's own id — not the message being reacted to. |
data.reaction.message_id | The wamid of the message that was reacted to. This is the one you match against your own records. |
data.reaction.emoji | The emoji. Empty string when the reaction was removed. |
data.reaction.action | added or removed. Derived from the emoji, so you can switch on it directly. |
data.direction | inbound — the customer reacted. outbound — the business did. |
data.source | Outbound only: mobile (the Business app phone) or api (your software). Absent on inbound. |
data.from / data.to | Direction-relative, like message.sent: inbound is customer → business, outbound is business → customer. |
data.reference | Only on reactions your own software sent, and only if you supplied one. |
data.contact, data.user_id, data.username | Inbound only — who reacted. Absent on every outbound reaction. |
Note:
data.fromis normally the customer's phone number, but WhatsApp does not always send one. When it does not, you get their WhatsApp user id instead — so treatfromas an identifier, not as something you can always dial.
Adding and removing a reaction
Removing a reaction is its own event, with an empty emoji and action: "removed".
{
	"event": "message.reaction",
	"data": {
		"message_id": "wamid.HBgMOTE5ODc2NTQzMjEwFQIAERgSN0U3…",
		"direction": "inbound",
		"reaction": {
			"message_id": "wamid.HBgMOTE5ODc2NTQzMjEwFQIAERgUQ0Uz…",
			"emoji": "",
			"action": "removed"
		}
	}
}
Each tap is a separate WhatsApp message with its own id. Reacting 👍, changing it to ❤️, then removing it altogether gives you three events, none of which replaces the others in your store. Key on data.reaction.message_id and keep the latest — that is the message's current reaction.
Sending a reaction from your software
The same endpoint adds and removes. Which one it does depends entirely on whether you send an emoji.
POST /api/v1/external/messages/reaction

{
	"to": "+919876543210",
	"message_id": "wamid.HBgMOTE5ODc2NTQzMjEwFQIAERgUQ0Uz…",
	"emoji": "👍",
	"reference": "invoice-2026-0817"
}
The message_id here is WhatsApp's id — the whatsapp_message_id from a send response, or the data.reaction.message_id off a webhook. It is never one of our uuids; see Two ids, and which is which if you are unsure which you are holding. Reactions use the send_text permission, so any key that can message the customer can react.
Note: A reaction never produces
message.deliveredormessage.read. WhatsApp does not emit those for a reaction — the only follow-up you can get ismessage.failed, when the reaction is rejected. Looking one up withGET /messages/:uuidworks as it does for any other send.
When a reaction is refused
Some refusals happen here, before anything reaches WhatsApp. Those return an error to your API call and produce no webhook at all — there is nothing to report on, because nothing was sent.
- The key lacks
send_text.403. Reactions reuse that permission; there is no separate one to grant. tois not E.164.422. The same+…format as every other endpoint.message_idis missing or empty.422. Up to 255 characters.emojiis missing.422. To remove a reaction send"emoji": ""— send the field empty, do not leave it out. Up to 16 characters.
The rest happen at WhatsApp, after we have accepted the call. You get a 200 and a message.reaction webhook first, then a message.failed carrying error 131009 once WhatsApp rejects it.
- The message is more than 30 days old. WhatsApp's limit on reacting, not ours — we do not check the age.
- The message is not in this conversation. A
wamidfrom another chat, or one of our own uuids passed by mistake. - The message was deleted, or is itself a reaction. You cannot react to a reaction.
Note: If the send fails outright rather than being rejected later, you get a
500and amessage.failedwhosedata.message_idis our uuid, not awamid— there is no WhatsApp id to report, because WhatsApp never accepted it.
Note: As with every other endpoint, you can try this without writing code. Open the key, press Test API, and pick
POST /messages/reaction— react to a message on your own phone and watch the webhook arrive.
Sending contact cards
A contact card is a vCard: a name, plus whatever you attach to it — phone numbers, emails, a postal address, a company. WhatsApp renders it as a card the recipient can tap to save to their phone. Handing a customer their assigned rep, the nearest branch, or the on-call engineer is what this is for, and it beats typing a phone number into a text message where it may not be tappable at all.
The one field that is required
name.formatted_name — the name shown on the card. That is the whole requirement. Everything else, including the phone number, is optional as far as WhatsApp is concerned.
You will find guides insisting that a first or last name must accompany it. That rule belongs to Meta's old on-premises API, which is retired. On the Cloud API a card carrying nothing but formatted_name is accepted and delivered.
Whether the recipient can message back
One optional field changes what the card can do. phones[].wa_id is the contact's WhatsApp id — the phone number without + or spaces. Supply it and the card gains a Message button that opens a chat with that person. Leave it out and the card can only be saved.
Sending one
This endpoint takes Meta's own request body unchanged. A contacts call written against the Cloud API — from Meta's documentation, or from code you already run — posts here with nothing edited but the URL.
POST /api/v1/external/messages/contacts

{
	"messaging_product": "whatsapp",
	"recipient_type": "individual",
	"to": "919876543210",
	"type": "contacts",
	"contacts": [
		{
			"name": {
				"formatted_name": "Priya Sharma",
				"first_name": "Priya",
				"last_name": "Sharma"
			},
			"phones": [
				{ "phone": "+911122334455", "type": "WORK", "wa_id": "911122334455" }
			],
			"emails": [
				{ "email": "[email protected]", "type": "WORK" }
			],
			"org": { "company": "Acme Retail", "department": "Support", "title": "Account Manager" }
		}
	],
	"reference": "ticket-88214"
}
You get back the same envelope as every other send — message_id, whatsapp_message_id, status — and the usual message.sent, message.delivered and message.read webhooks follow. The message.sent payload carries message.type: "contacts" and the cards you sent, so a handler that logs what went out needs no special case beyond reading that field.
| Field | Required | What it is |
|---|---|---|
messaging_product | no | whatsapp. Meta's, and redundant here — the URL already says what this is. Accepted so a Graph body needs no editing; rejected if it says anything else. |
recipient_type | no | individual. Same story. |
type | no | contacts. Same story. A body claiming some other type is rejected rather than quietly corrected. |
to | yes | The recipient. Either Meta's bare digits (919876543210) or +E.164 (+919876543210) — this endpoint takes both. |
contacts | yes | An array. One to ten cards per message. |
contacts[].name.formatted_name | yes | The name on the card. Up to 255 characters. |
contacts[].name.* | no | first_name, last_name, middle_name, prefix, suffix. |
contacts[].phones[] | no | phone, type, wa_id. type is a free label — WORK, HOME, CELL, whatever you use. |
contacts[].emails[] | no | email, type. |
contacts[].addresses[] | no | street, city, state, zip, country, country_code, type. |
contacts[].urls[] | no | url, type. |
contacts[].org | no | company, department, title. |
contacts[].birthday | no | YYYY-MM-DD. WhatsApp rejects any other format. |
reference | no | Your own id, echoed back on the webhooks for this send. |
Note: Ten cards per message is our limit, not WhatsApp's — WhatsApp accepts up to 257 but advises sending far fewer, because a wall of cards reads as spam and earns the block that follows. If you genuinely need more, send several messages.
Note: Fields we do not recognise are dropped rather than rejected. A typo like
nicknameormobilewill not fail the call — the card simply arrives without it. Check the table above if something you sent is missing on the handset.
When a contacts send is refused
Some refusals happen here, before anything reaches WhatsApp. Those return an error to your API call and produce no message.sent webhook — nothing was sent.
- Outside the 24-hour window. A contact card is a freeform message and there is no contacts template, so it cannot open a conversation — it can only continue one. Send an approved template first.
- The key lacks
send_text.403. Contact cards reuse that permission; there is no separate one to grant, and nothing to change on existing keys. tois not a phone number.422. Digits, with or without a leading+; no spaces, dashes or brackets. Note this endpoint is more forgiving than the others, which insist on the+.- The envelope contradicts itself.
422.type: "image"ormessaging_product: "sms"on this path is a mistake worth telling you about, so it is rejected rather than overridden. contactsis empty, or holds more than ten.422.- A card has no
name.formatted_name.422. It is the only field we insist on.
The rest happen at WhatsApp, after we have accepted the call. Those come back as a 500 carrying WhatsApp's own message, and a message.failed webhook — a malformed birthday and a rejected wa_id both land here rather than being caught earlier.
Note: Unlike the other endpoints, this one is not yet in Test API or Get code — those cover text, template and media only. Until it is, send a real request against a number you own to try it.